If you’ve ever wanted to start a podcast, now would be the perfect time to do it. The medium is hotter than it’s ever been and continues to grow at a lightning-fast pace.
Moreover, people often prefer listening to audio content over reading it.
Wondering how to start a podcast? You have come to the right place.
There are so many reasons for starting a podcast! Some of those reasons are to grow your business, connect with people in your niche, create a relationship with your audience, and self-fulfillment.
As of January 2020, there are over 1 million podcasts available, with over 30 million podcast episodes to listen to. These numbers might be intimidating, but armed with the right tools and information, it won’t be difficult for you to carve out a niche for yourself in podcasting.
Many companies create a podcast to promote their products and services.
Of course, some podcasts succeed, while others are not well-known in the industry. The quality of your show can make all of the difference. Listeners are looking for an engaging and entertaining show that makes them return to it every week for the latest episode – deliver it, and you can easily make money and find prestige with podcasting.
Here is a comprehensive “how to make a podcast” guide with all that you need to know, along with some tips for starting a successful podcast.
Below is a list of steps to start your own podcasting journey this year.
How to Start a Podcast in 9 Easy Steps
- Step #1: Choose a topic you love
- Step #2: Pick a podcast title
- Step #3: Write a sound description
- Step #4: Get your artwork created
- Step #5: Pre-plan your episodes
- Step #6: Pick your podcast hosting provider
- Step #7: Prepare and make a recording
- Step #8: Publish an episode
- Step #9: Submit to directories
FirstSiteGuide is a free resource that is 100% supported by readers.
Disclosure: If you purchase products through links on our site, we may earn a commission. It comes at no extra cost for you but it helps us to create more useful content.
To skip the basic podcasting information, use the link below:
Jump to Step #1: Choose a topic you love
A quick primer – How to start your own podcast
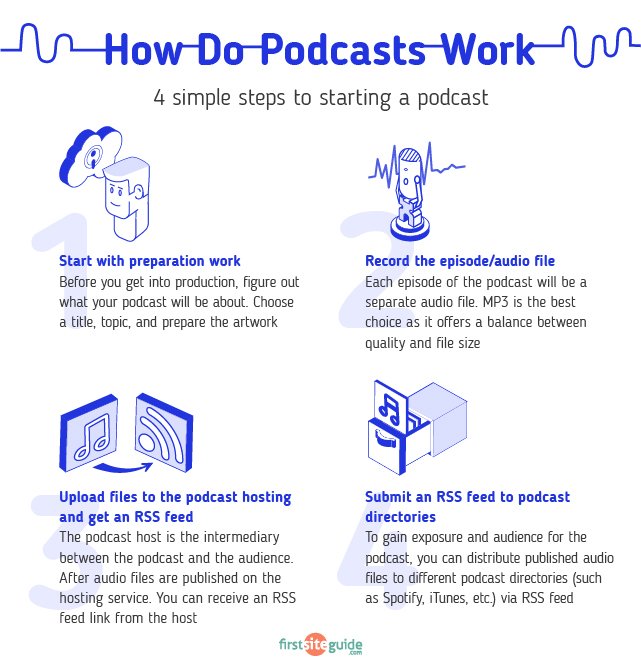
There are four simple steps to starting a podcast. I’ll explain these steps in further detail a little later, but for now, get familiarized with these steps. Once you’ve mastered these, you’ll be able to start your podcast in a matter of days, maybe even a few hours.
Here are the four basic steps to help you to understand precisely how podcasts work:
Start with preparation
Way before you ever get into the actual production and technical work, figure out what your podcast will be about. Also, choose an appropriate title, topic, and format right at the start.
Record the episode/audio file
Each episode of your show will be a separate audio file that can be made available in various formats. MP3 is the best choice as it offers a balance between quality and file size.
Upload files to your podcast host and promote your RSS feed
The podcast host is the intermediary between your podcast and your audience. After providing the description and posting the relevant artwork, the podcast is published on the hosting service. You will receive your podcast’s RSS feed link from the host.
Submit your RSS feed to podcast directories
To gain exposure and an audience for your podcast, you can distribute the published audio file (RSS feed) to different podcast directories such as Spotify, iTunes, and others.
Step #1: Choose a topic you love
Just like blogging, you need to select a niche for your podcast that provides information that is in high demand with listeners.
But before you choose a topic, you should realize that listeners use podcasts for expert advice, and you must have good knowledge of your niche. While brainstorming for a unique topic, you must take your passions into account, consider who your audience would be, and the type of show that they would enjoy. Pondering over such questions and devising a plan will give you a competitive edge over other podcasters — and can help expand your audience.
Once you have determined the specific niche you want to speak on, you are one step closer to starting a successful podcast.
Step #2: Pick a podcast title
A podcast title can help the listener anticipate the content and purpose of your podcast. We suggest you put some thought into choosing a title for your podcast.
You are free to choose a title that best reflects your target audience. Here are a few things you should consider when brainstorming for the perfect title. You must consider key phrases that are relevant to the title. This will help your podcast become more visible on search engines. The title must also be suitable for social media handles and the domain name of your podcast so that your listeners can find you easily on the most popular podcast platforms.
There are three main options to choose a title for your podcast:
The clever name
You must think of an apt title for your show that is catchy yet understandable at the same time. Remember that people should be able to locate it when they search for information about your chosen topic. You must also try to incorporate a description into the title since, without great content, there will be no point in a title, no matter how good it is.
The descriptive name
It means you can simply name the show for what it is about. For example, a personal trainer’s podcast could be called ‘The Fitness Podcast,’ which perfectly highlights the niche of the podcast. But you must avoid using long names because you will be saying the name quite often in your podcast.
Using your name
This is the perfect method of naming your podcast, but only if you already have a large audience. If your podcast is based on a historical topic and you use your name in the title, the audience will think, who is that? And move past your podcast.
Step #3: Write a sound description
You should write a descriptive paragraph about the contents of your show to entice listeners. This will help them decide whether they want to stick around and listen to the show.
In the description, you have complete freedom to play around with keywords and phrases that your target audience might use to find a podcast on your chosen niche/topic.
The description should be appealing so that your audience feels compelled to click and listen to your podcast. You need to start with something that matters to your audience by providing a little information in the description, after which they should be curious enough to sit through the whole podcast. Or you can talk about yourself and make it evident to them that you are someone worth listening to.
You are free to add credentials or any other proof that shows your authority on a topic. And feel free to share your credentials on social media if they are worthy.
You have enough room to explain what your podcast is about and why it is worth the listener’s time.
Step #4: Get your artwork created
The podcast will require some artwork or a square image that represents your show and the niche it belongs to. Although most podcasts lie in the audio medium, the visual medium is just as important.
This will be the first thing your audience sees in the podcasting directory, before choosing to listen to any of your content. The artwork or your logo is the face of your podcast. Make sure that it grabs the attention of your listeners and makes you stand out from the competition. If you are thinking of putting your show on Apple Podcasts, the image will give it a better chance of being featured in the highly visible section of iTunes, otherwise known as the ‘What’s Hot’ section.
The logo should be a minimum of 1400 x 1400 pixels and a maximum size of 3000 x 3000 pixels in JPEG or PNG format. Optimize your images for mobile devices by compressing the image files.
Invest in a good logo for your show to attract more people to your channel. It’s worth it.
Step #5: Pre-plan your episodes
Pre-planning is an essential part of podcasting since creating them can be a very stressful process. Every podcast must be pre-planned with a tailored approach to make sure that the quality remains consistent throughout the entire show.
Here are some things that you must keep in mind when planning an episode for your podcast:
Pick a podcast topic
You must be passionate about the podcast topic that you choose so that it can provide value to the audience. Also, you should possess a certain level of knowledge or expertise in that particular niche to market your podcast the right way.
To choose a topic that you want to talk about, you should have a general idea of what you plan to discuss. The more you know about that topic, the better the results will be of the podcast. You can research other podcasts by listening to as many as possible and learn about a particular niche, the tone most podcasters choose to adopt, and the sound quality to aim for. You should also consider trending topics and aim to work around them to deliver exactly what your audience wants.
Choose a podcast format
The structure of your podcast is critical. Here are a few podcast formats to choose from:
- Interview style – This is the most popular format these days as each episode introduces the listener to exciting and inspirational people from a specific niche. The format is generally unscripted and free-flowing and requires minimum editing.
- News and current events show – This format focuses on sports, politics, technology, or any other hot topic that lets you provide non-stop fresh content to your listeners.
- Multi-host show – A podcast with more than two people creates intrigue and can be highly entertaining with a conversational tone. There will be less pressure on you since the responsibility of presenting great content to your audience is divided among all hosts.
- Solo style – In these podcasts, you can tell a story in each episode that is relevant to the topic of your podcast. It could be in any tone as long as the content is educational or motivational. By occasionally inviting a guest on the show, you can entice the audience and engage them in your podcast.
Determine the podcast length
You need to respect your audience’s time and set a reasonable episode length that is consistent throughout the series.
Twenty minutes is generally the ideal episode length for a podcast, as most people listen to podcasts while commuting to and from work. However, if your audience wants more, you can assess the stats and tweak your podcast length.
To keep the audience hooked, choose an entertaining format such as interviewing different people or adopting a different tempo for your podcast. By adding variety to your podcast, the length of an episode will not matter as much since your audience will enjoy your content.
The only thing that determines the length of an episode is the nature and quality of your podcast. So give it some thought before deciding on how long each episode will be.
Podcast schedule
Your schedule determines the frequency with which you post new episodes. It is essential for the success of your podcast since it allows your audience to remain connected and eagerly wait for the next episode.
Statistics show that a podcast that puts out new shows weekly grows at a much faster rate than those that publish on any other schedule. So you must produce fresh material regularly to meet the expectations of your audience. You must also stick to a calendar that helps you to organize your content to meet the demands of your audience.
Step #6: Pick your podcast hosting provider
To make your podcast visible in the digital space, you need to sign up with a hosting company. These are platforms that store your files and provide access to your listeners so that they can download and subscribe to your podcast.
Podcast hosting platforms provide different features and options, but they all follow similar methods to store audio files.
To select the right service, you need to evaluate five criteria that will help your podcast grow.
These features include:
- Storage capabilities
- Website integrations
- Audience analytics
- Monetization support
- Social sharing features
The cost and subscription fee of each hosting service differs according to the features it provides. For perks like unlimited storage or a web domain, you may have to pay more than the usual fee.
Here are some of the most popular and reliable options for your podcast:
BuzzSprout
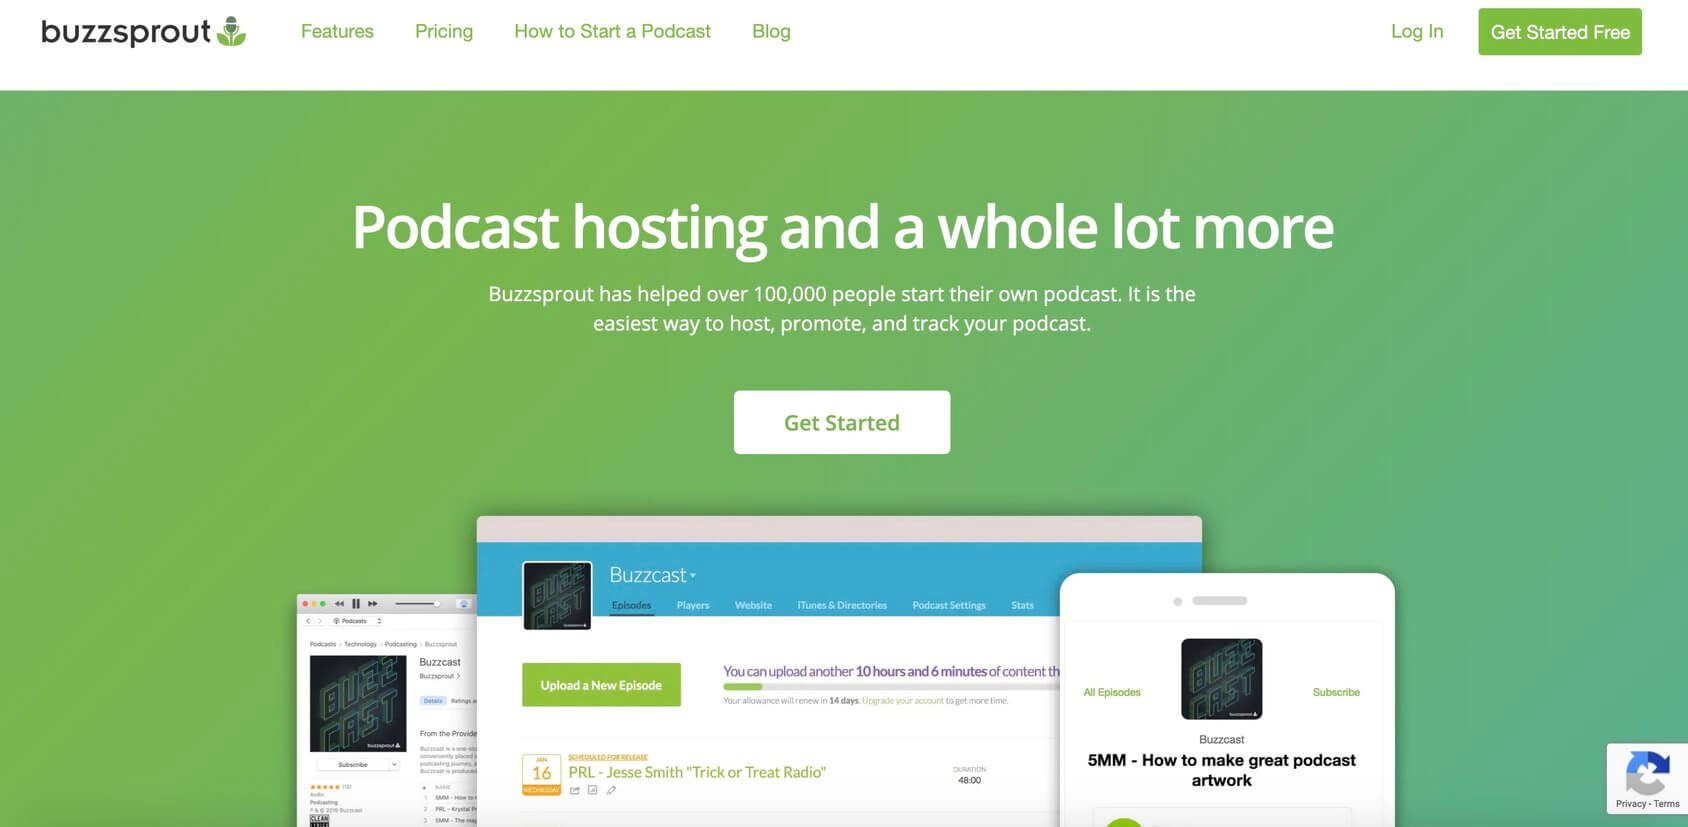
BuzzSprout is simply the best podcast hosting platform out there, which makes things easy for all new podcasters. It has a simple dashboard and interface that allows you to get your podcast up and running in no time.
BuzzSprout possesses all of the features that you need to advertise your podcast content on the Internet. Its basic plan starts at $12 a month. BuzzSprout also offers a free option that hosts episodes for 90 days.
PodBean
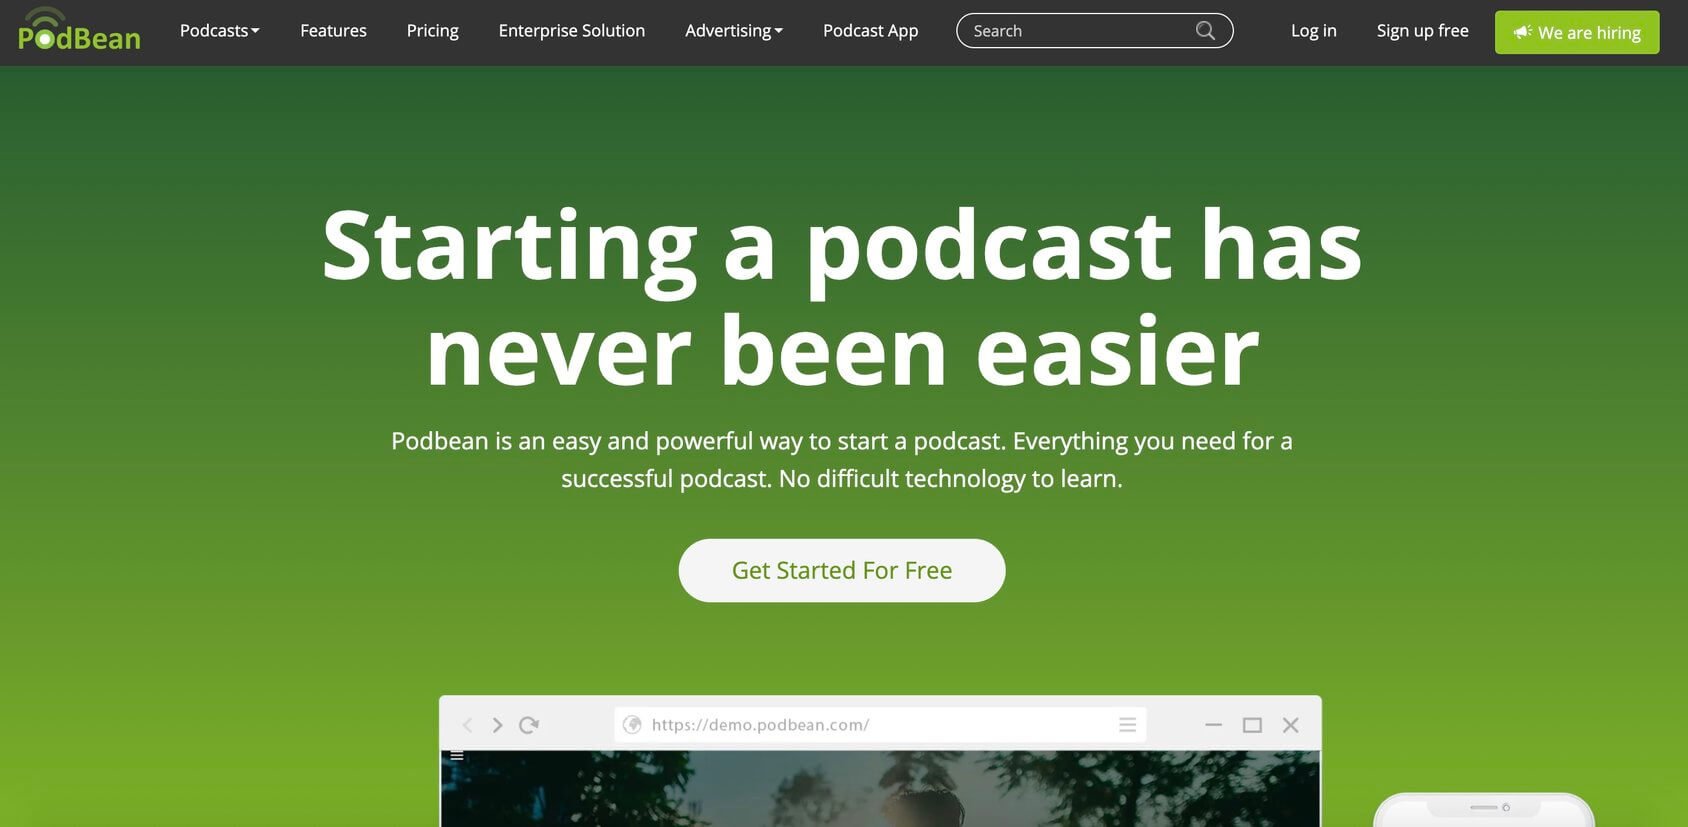
PodBean is another podcasting solution with ideal tools to help you in all stages of podcast production. Offering great pricing plans and easy-to-use features for new podcasters, you cannot go wrong with this service.
With $9 per month that is billed annually, you get access to unlimited storage and bandwidth, website domain, comprehensive listener analytics, and an iPhone or Android app.
Transistor
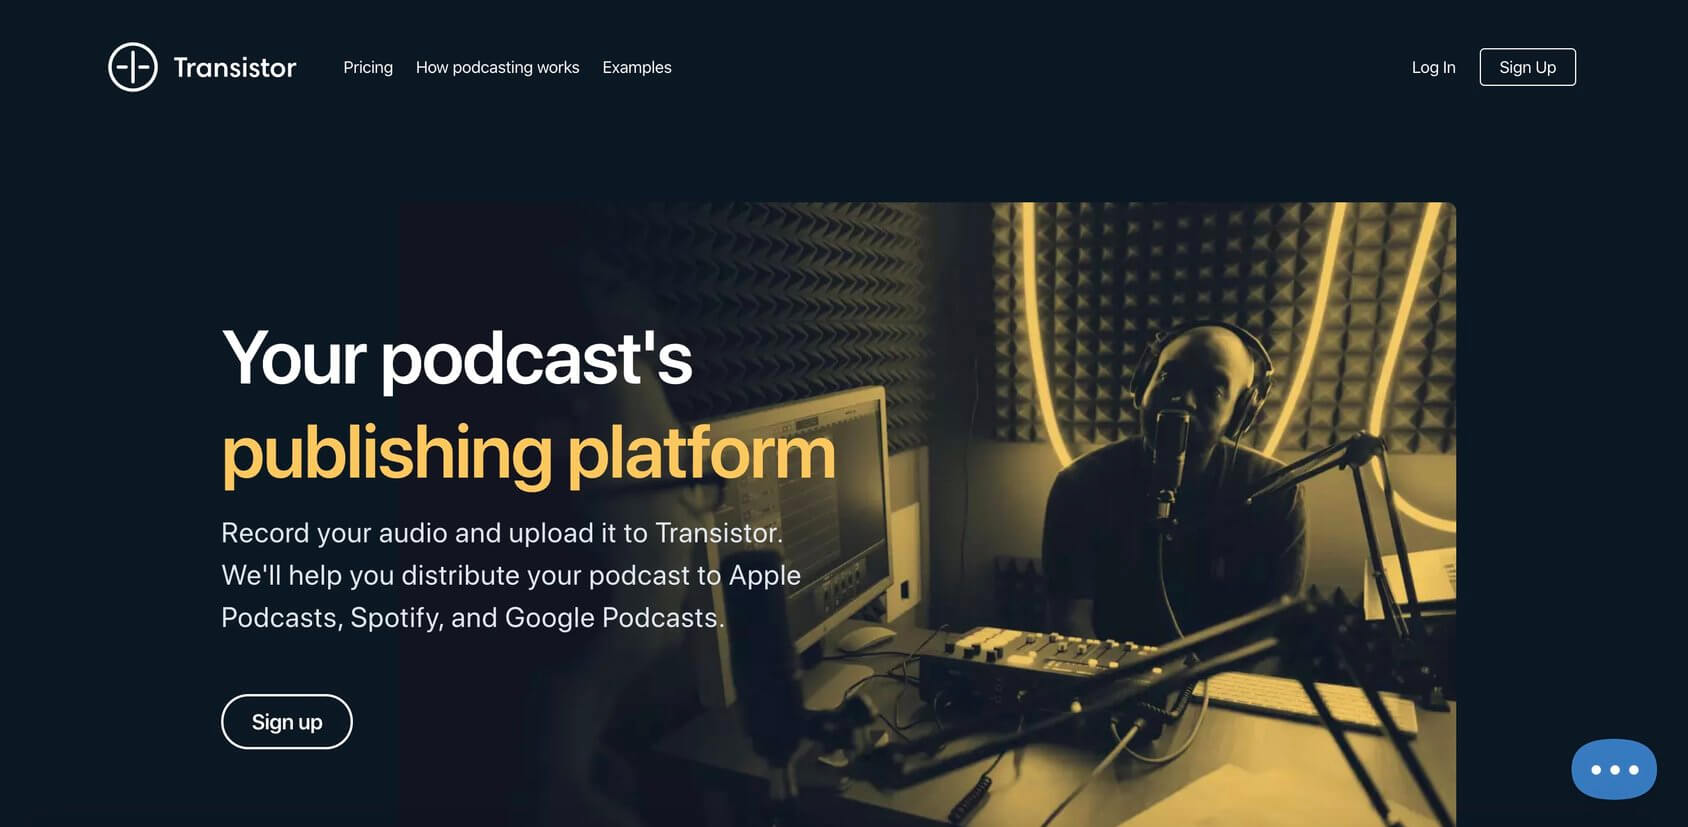
This is a relatively new podcast hosting company that has quickly made quite a name for itself. Other than hosting your audio files, Transistor has excellent tools for podcast monetization and analytics. In addition to this, you can also host multiple podcasts, customize your player, and create a beautiful website.
With Transistor’s primary focus being on growing your audience, it lets you import your podcast from a different podcasting platform without any difficulty. It also allows you to test their features with a free 14 – day trial, after which it charges users $19 – $99 per month.
Feel free to check out our best podcast hosting guide if you want to explore more options.
Step #7: Prepare and make a recording
Recording high-quality podcasts require effort and preparation both for the content and to set up audio/video for a podcast.
Preparing a plan
The first thing that you need to do is to figure out a plan for your content. You need to approach the podcast with a focus on making it comprehensive with quality information to keep your audience engaged.
No matter what the format of your show is, you need to understand the type of content that your audience wants. Then, for each episode, you need to assess what questions your listeners are asking, what problems they need addressing, and what information they cannot get anywhere else but your podcast. After devising solutions to these questions, you need to prepare a script for the entire episode.
Creating an episode script
Podcasters often do not agree on the process of writing a script for a podcast. Whether it should be detailed or provide a simple overview depends on the content of your podcast. A detailed script can help you to create a value-packed episode that covers every single thing with little chance of error. However, it often removes spontaneity and changes the format of your podcast.
For a lighter script, just a collection of bullet points is enough to create an engaging podcast. But the downside of a lighter script is that you might forget the key points and start repeating yourself.
If you ask us, we think a simple solution is to start with a detailed script and slowly narrow it down to make it more meaningful and effective. With practice, you will be able to strike the right balance between your recording style and the type of script you should create.
Recording equipment
To record a high-quality podcast, you require the best podcast recording equipment. There are many things you can purchase to create a podcast without spending huge amounts of money.
Here’s all that you need to start a podcast:
- Microphone – Any microphone can help you to record the podcast, but there’s a certain standard of quality that you must adhere to for producing great content. Listeners can tell the difference between a low and a high-quality microphone. You can look up microphones on the Internet and choose one in your budget. To keep things simple, you can start with a USB microphone that can be easily plugged into your computer.
- Digital recorders – These devices come in handy when you are recording a podcast with other people in person since it’s hard to record with more than one USB microphone plugged into a single computer. The audio files will be automatically organized and stored on a memory card, which you can then access from your computer.
- Computer– Any Windows computer or Mac will work to record, edit, and upload the podcast. If you choose to record directly onto your computer, it must have the right ports for USB microphones.
- Headphones – These are an essential piece of hardware in your podcast setup that helps you to listen to the recordings so that you can know what exactly you sound like. They can also let you identify areas of improvement and things you can change to improve the overall quality of your podcast. Headphones are also used for phone calls if you receive calls on a podcast to engage with your audience.
Recording and editing software
The final component in the podcast equipment list is choosing the right podcast recording software. The following are some of the best podcast software that you can choose for your podcasting career.
- Adobe Audition – This is specially designed for podcast editing. It has advanced tools that include a background noise-reduction feature, advanced compression, and much more. It is a great podcast editing software. With a high-quality recording option on more than 32 tracks, there isn’t much this software can’t do.
- Audacity – This is a cross-platform audio editing software with powerful features. People have been using the platform for decades since it is free to use for a limited time. You can use Audacity to record live audio through a microphone or digitize audio files from any other media. It gives you the option to create 16 – bit, 24 – bit or 32 – bit sound bites. The audio clips are easy to edit, as well. However, you cannot upload podcasts directly from the software onto a podcast hosting service.
- GarageBand – This is a popular choice among podcasters since it provides a wide range of free podcast recording software features. You can take multiple recordings and select the best one to share with a podcast directory. The variety of plugins that the recording software offers allows you to learn how to make a podcast even more dynamic and appealing for the audience.
Getting music
Integrating music into the intro of each podcast episode helps to set your content apart and adds a bit of flair to it. These are usually short voice-overs with music that introduce the podcast, the host, or the tagline of your podcast. You can record it yourself or choose any royalty-free music available on the Internet.
Step #8: Publish an episode
Publishing episodes means uploading audio files after editing them and providing all the necessary details with them. However, before uploading them onto a podcast host of your choice, you need to take care of a few things:
Edit the episode
Editing will vary according to the length of the audio file you have recorded and how many people you had on the show. The longer your recording is, the more time it will take to edit the file properly and put it up on a podcast directory. Once you are done with the necessary edits, you need to polish the intro and outro of your show to ensure consistency across the entire episode. Keep in mind that editing audio requires some knowledge and practice, and in the end, your goal is to prepare the best sound for a podcast.
Export your MP3
You need to publish your podcasts on a hosting service in an MP3 format, especially on platforms that have bandwidth restrictions. Some podcast hosts charge extra if you post bigger files. Hence, during the export process, you should keep your MP3 files as small as possible without compromising the quality. After exporting the MP3, you need to tag it with metadata, such as your podcast name, logo, description, and website URL. This will make sure that your audience gets all of the information that they need about your podcast.
Publish the episode
After converting your file into MP3 and selecting the right podcast hosting platform, you need to upload your podcast onto that hosting service. The host is the link between you and podcast directories such as iTunes and Google Podcasts. You can publish the podcast on the host, or you can schedule it to post on a later date.
Step #9: Submit to directories
After you publish your podcast, you need to select a podcast directory that helps listeners discover, listen, and subscribe to your podcasts. You need to post an RSS feed link that you get from the podcast host to the directory of your choice. You can select one or more podcast directories depending on your strategy, but you need to choose them wisely. Here are some of your best options:
iTunes
iTunes is the largest podcast directory, so it should be your number one priority. With its powerful search ability and category system, iTunes is becoming increasingly popular for podcast distribution. It can showcase your podcast to new listeners and allows them to rate and review your show. Not only does it feature popular podcasts, but iTunes also provides rankings on new podcasts daily. This makes it an essential directory for your podcast show.
To learn more about the process of submitting your podcast to iTunes, you can refer to the FAQs below.
Spotify
This is another popular podcast platform that hosts many podcasts. Since there are so many people that already use Spotify for music, the podcasts that are submitted on Spotify have more chance of gaining traction and amassing a huge audience over time. It also gives you a great overview of who your audience is and what they are streaming, which will help you to plan your future episodes. Spotify was created for podcasters to get discovered, and with constant updates, this platform makes sure that more people listen to your show.
Since you already learned how to create a podcast, check our FAQ’s below to learn how to upload your podcast to Spotify.
Stitcher
Stitcher is the second-largest podcast directory and another excellent platform to allow for your podcast to be discovered by people. It is a mobile app only, therefore, to listen or publish podcasts here you need to have the app on your mobile device. Stitcher will give you access to millions of listeners and a chance to download statistics such as listening time or monthly active users. Many people listen to shows on the platform, making it key to your growth if you plan to stick with podcasting for a while.
Blubrry
This is a podcasting community that gives podcasters the power to make money, reach more audiences, gain access to listener analytics, and share audio or video podcasts. Blubrry has a remarkable digital interface where you can submit your podcast, and listeners can listen and subscribe to it. Listing your podcast on this platform will be considered beneficial, and even if you do not decide to get their services, you can make use of their free consultation.
SoundCloud
This is another platform tool for giving your podcast more exposure since it reaches 200 million unique listeners around the globe across all devices and platforms. SoundCloud has an agile player and subscription model that works perfectly for a podcaster trying to increase their audience. If your podcast is centered on a community and you get lots of interaction, this platform might be a good place to start.
Pocketcasts
Pocketcasts sets itself apart from other podcast directories with over 300,000 shows for listeners that can be searched by the name of the author. It has invested a lot in designing the platform to make the process of discovery easier for listeners. Moreover, it has done a great job of offering new options for podcast listeners who continuously look for unique shows. Therefore, as a podcaster, the platform provides the potential to gain access to a massive number of listeners and help listeners discover your content.
3 Common podcasting myths
Starting a podcast can be a daunting task. So, to put your mind at ease, let’s debunk the three most common podcasting myths that keep people from making their own podcast.
Podcasting is expensive
Podcasts are free to create and listen to. You don’t have to buy the best podcast recording software or the most expensive equipment to start your podcasting career. If you want to start quickly, all you need is a microphone, headphones, and audio editing software to produce a quality podcast. When you start to become more experienced, or your podcast starts to attract a larger audience, you can upgrade to better equipment. You can use free editing software like Audacity and choose a free podcast hosting platform to get started on your journey without breaking the bank.
To podcast, you have to be a tech person
Not at all. You don’t need to be a tech expert to know how to start a podcast. With the advancements in technology, our smartphones and computers can pretty much do everything for us. For a beginner, creating a podcast is not that difficult. All you need is some familiarization with your gadgets, and off you go! You can educate yourself about the process and make a checklist of essentials before making a podcast.
No one will listen to your podcast
You should not start podcasting with the sole purpose to amass a huge audience. If this is the goal of your podcast – to attract more listeners and earn money – then you are setting yourself up for disappointment. You should be passionate about your podcast and excited to share your knowledge and ideas with the world. Do not let the fear of not reaching out to more people stop you from doing something you are excited about. By putting more effort into your podcasts and providing useful content, you can attract a bigger audience in no time.
FAQs
A podcast is a series of digital audio files that are based on a specific theme or topic, posted on the Internet for people to listen to. Unlike radio shows, you can listen to podcasts whenever and wherever you want. They can be accessed on a computer, tablet, or smartphone by streaming or downloading the file. Also, you can subscribe to various channels and get a notification each time a new episode is uploaded.
Podcasts are an excellent way to reach out to people and connect with an audience. Even the most mundane topics can be converted into exciting learning experiences through a podcast. Although it sounds like a complicated process, podcasting requires very little investment and is easy to take up. A podcast allows you to provide more quality information to your audience than any other digital platform. It presents a massive opportunity for podcasters to showcase their expertise and skills in front of the entire world.
A drive to speak on topics that you are passionate about is incredibly important when starting a podcast. It helps in building an audience base from scratch and positions you as an expert in the industry. As you increase your authority over the topic of your choice, you attract more and more opportunities, such as traffic for your website. This makes it easier for you to sell your products or services to a bigger audience. It is no secret that creating a podcast can be hard work, but a desire to cultivate long term relationships is pertinent in converting the idea of a podcast into reality.
If you have the right equipment and you have figured out the podcast hosting platforms and the directories you want to submit to, a podcast setup can be completed in a few days. The timeline depends on you and how early you want to set it up.
There is no clear answer as to what your podcast will cost you since it depends on the type of equipment needed for the podcast you choose, the hosting platform, and the podcast directory you select. As long as you have a computer, you can buy everything you need for less than $100 and produce a high-quality podcast. For the best equipment and an expensive hosting platform, you can expect to pay around $200 – $500 for a quality podcast set up. It all depends on your requirements, so don’t let the cost of podcasting hinder your decision to create a podcast. Remember, it is your content that matters in the end.
You can start a free podcast if you already have a computer, laptop, or smartphone, and an Internet connection. All you need to do is to plan your podcast, choose a title, start recording with the equipment you have, write a fantastic description for it, record your first episode, and edit. After that, you can distribute your content to a free podcast hosting service such as Anchor, which will then spread it on a podcast directory. You can then monetize your podcasts through sponsorship, advertisements, affiliate marketing, crowdfunding, or donations.
The necessary equipment you need for a podcast includes microphones, headphones, and a computer. You need to invest in a good microphone that can connect to your computer or laptop through a USB port. Headphones are required to check the quality of sound and to edit out any irrelevant sound bites from your podcast. Other than these essentials, you can buy mic stands, shock mounts, headphone amplifiers, and mixers.
If you want to produce daily content, the maximum length of your podcast should be between 10 – 15 minutes, but if you plan to upload weekly, make it 60 – 90 minutes.
If you want your podcast to be heard by the world, you’ll need to pick a hosting platform where you can upload it. Different podcasters use various hosting services because each offers unique services, pricing, and marketing capabilities — there isn’t a one-size-fits-all approach.
There are several podcast hosting platforms to choose from; some offer extra features, while others are very basic. They should at least allow you to attract more listeners, share your podcast on social media, and monetize your podcast. Buzzsprout, Podbean, and Transistor are some of the most popular podcast hosting platforms with efficient features.
You need to understand the purpose of a podcast feed before following the difference between a host and a directory.
Podcast feed is a regulated form of content that is readily displayed by other websites, applications, and directories. The podcast hosting platform of your choice creates a feed for you automatically that contains all of the necessary codes for your content. This enables users to browse all titles, descriptions, and access the right audio file when they choose to download a podcast. The podcast host gives you a unique feed link for your show that you can take to the directory of your choice such as Apple Podcasts or Spotify.
The hosting platform and the podcast directory are two different places where the former publishes the show and helps the podcaster to take it to a directory. In contrast, the latter helps in revealing the show to its audience and assists in building a community.
Top podcasts can easily make more than a million dollars a year. The Daily Podcast by The New York Times grossed over $10 million in advertising in 2018. Going by the fact that businesses spent $497 million on podcast advertising, there is no denying the huge money-making potential of a successful podcast. The Joe Rogan Experience podcast makes around $75,000 per episode, while ‘This American Life’ bags at least $50,000 per episode.
Promoting and distributing your podcast on the best podcast platform is the key to a successful podcasting career. Stats show that 70% of listenership comes through iTunes and other native apps. So for starters, make an effort to get your podcast on iTunes and Google Podcasts.
Next, use the power of social media to spread the word about your next episode. Create shareable quotes, and share video or audio snippets. This will get the audience excited. You can also make Instagram stories to show people what goes on behind the scenes to intrigue them. You can work with podcatchers and aggregators that collect and play podcasts for a vast audience, which can assist you to discover more options. Some popular ones include Stitcher, Podcast Addict, and TuneIn.
Yes, you can, and you should put it there immediately. The great thing about Spotify is that it has a separate section dedicated to podcasts. You simply have to create an account, if you don’t already have one, create one and get started.
Click on the ‘Get Started’ tab and then click on the page that says ‘Add your podcast.’ You might then be asked to read the terms and conditions before proceeding to the addition of your LLC (or your podcast/business name) and then click on ‘Continue.’ You will then be asked to enter your RSS feed. Once all of the information is correct, on the right side of the page, you will see the title of your podcast, your logo, and your description. You will need to ‘Add podcast info’ on the page, pick your country, language, along the category of your podcast and hosting provider service. Click ‘Next’ and review all the details. ‘Submit’ and then you may have to wait for 2 – 5 days before your account is registered on Spotify. For most account holders, the process is done within a few hours. Keep in mind that Spotify will not send you an email or message once the process is complete. You will have to keep checking the listing to see if your account has been created or not. As soon as the account is made, you can start uploading your podcasts!
iTunes is even easier than Spotify! It is also the perfect way to make sure the majority of your listeners can access your podcasts. Creating an account and uploading your content on iTunes is as simple as ABC. Here is how you can get started.
When you have recorded your podcast, edited it, and selected the best podcast hosting platform, retrieve your RSS feed link or URL and save all of the data somewhere safe. Now download the iTunes app and create an account. Once the account is set up, upload your podcast on Podcasts Connect and wait for approval from iTunes. Yes, that is it!
Stitcher and TuneIn are other platforms that you can use for quick podcast uploads. They are easy to use, and with them, you can expand the circle of listeners you have for your podcasts and improve your visibility. To become a contributor on Stitcher, you have to become a content provider and create an account. ‘Sign In’ to your new account and click ‘Add Shows’ that is present at the top of the page in the navigation bar. You will be required to add your RSS feed and share your details. Accept the terms and conditions and then tap the ‘Continue’ button. Be sure to review your information before applying. You will have to wait for the approval which takes anywhere between 3 – 7 days. The Stitcher app approves all of its shows manually, which explains the wait. But the wait will be worth it!
To submit your podcast on Google Play Music, you need to visit the portal and click the “Add a podcast” button. Then you need to paste your podcast’s RSS feed URL and click submit. After submitting your RSS feed, you need to verify the ownership through your email, so make sure that your contact information is up to date. Once verified, you are ready to review and publish your podcast after thoroughly checking it. If everything looks good, you can hit “Publish Podcast” and then wait for someone to review it before it’s life manually.
Blubrry allows podcasts to be submitted on its directory through the PowerPress plugin, which is free, easy to use, and optimized for all of your podcasting needs. All you need is a title, description, keyword for Blubrry tracking, and the website URL for your specified program. After submitting your podcast, you need to wait for a review and then approval.
To launch Pocketcasts, you just need to head to their submission page, copy and paste the RSS feed link in the type box, and click Submit. After approval, you are presented with a shareable link to pass around so that people know your podcast is now available.
It is extremely easy to submit your podcast on Soundcloud, which starts with creating a profile with an active email address. After completing your profile information, add a description to your podcast and social media links. Go to the content settings page and choose a category and the language of your podcast. Double-check the upload default setting and save the changes. You can now submit your podcasts to SoundCloud.
Conclusion
You can learn how to start a podcast and keep it running successfully with all of the information presented in our guide.
Begin with a plan, choose a theme for your podcast, and set up the necessary equipment to start recording your podcast. When creating a podcast, it is a good idea to get practice with the equipment you plan to use for recording to avoid any issues during production. After producing an episode, choose a podcast hosting service and submit it to their directory to reach out to your audience.
If you still have any questions about starting a podcast, get in touch with us today!
Great information! I’ve decided to start a podcast so this guide really helped me. I’m going to take my time to get everything together but this information has made it a lot less frightening! Thank you from Costa Rica!
Thanks Dion and good luck with your new podcast.
This information was very helpful, especially for a beginner.
Thanks Ruby! Let us know if you need any help.