
Millions of people spent more than 386 billion U.S. dollars on Amazon in 2020 alone. You can get a cut of that revenue by joining and implementing affiliate offers from Amazon on your own website.
In this guide, we will explain what the Amazon Associates program is and how to get started with it. Also, we will show you the best practices for finding and promoting Amazon affiliate products to earn money from them.
Table of contents
- What is the Amazon Associates program?
- How much can you make as an Amazon affiliate?
- How to make money with the Amazon affiliate program
- Choosing affiliate products to promote
- What type of content to write as an Amazon affiliate
- Amazon affiliate tips and tricks
- Examples of successful Amazon affiliate websites
- Conclusion
Before you dive into reading this guide, we are assuming that you have already completed two things: started a blog and picked a profitable niche.
What is the Amazon Associates program?
Amazon Associates is one of the first online affiliate marketing programs, launched in 1996. Amazon Associates holds the biggest share of the affiliate marketing business with 45.77%. The program has an established track record of developing solutions to help website owners make money by advertising millions of products from Amazon. When website owners and bloggers who are Associates create links and customers click through those links and buy products from Amazon, they earn referral fees. It’s free to join and easy to use.
There are plenty of ways that you can establish revenue when you start a blog or build a website. However, Amazon Associates represents one of the best-known methods for making money online. The whole process is easy to understand.
Just create an account with Amazon Associates (account approval usually takes 24-48 hours), acquire individual affiliate links and include them on your website. When visitors click these links and make the purchase, Amazon will give you up to 10% of each sale. Importantly, this does not only refer to the actual item you are linking to, but to any other product that the user purchases from Amazon.
Now all of this sounds exciting, right? Well, the whole journey takes time, and making the right decisions along the way. Therefore, let’s take a look at how you can earn money with Amazon Associates.
How much can you make as an Amazon affiliate?
Amazon will give you a percentage fee for each item that was sold and referred through your affiliate link. A user can buy any product within a 24 hour period (or 30 days if they added an item to their cart) via your affiliate link, and you will receive the commission for that sale.
Amazon offers different fee rates for various product categories. Here is the breakdown:
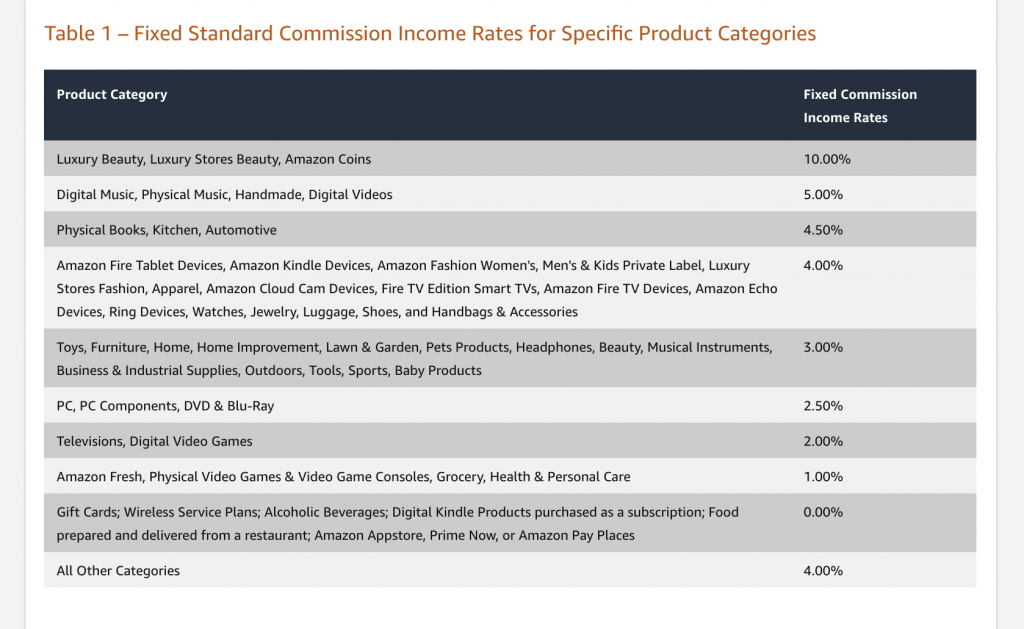
It’s all about sending targeted visitors to Amazon and getting a commission for the stuff that they buy. As you can guess, your earnings will depend on the number of people you refer and the amount of money that they spend. These figures will depend on the traffic to your website and the niche products that you promote.
You can earn from $50 to $50,000 based on the performance of your site or blog, and we will show you some successful Amazon affiliate websites below.
For more information about fees visit the official Amazon Associates Program Fee Statement.
How to make money with the Amazon affiliate program
Inside Amazon Associates, you’ll find a variety of means to generate affiliate links. You can start placing these links on your blog or website to redirect visitors to Amazon. By clicking these affiliate links, people will be redirected to specific products you recommend on Amazon, and when they purchase something you will be making a commission for each sale.
Amazon offers three ways to add product links and ads on your website: Text links, Banners, and Native shopping ads.
Text links
By far the most efficient way to refer a visitor to Amazon is by using a text link within your website content. According to Darren Rowse from Problogger, who made hundreds of thousands from the Amazon affiliate program, 99% of conversions come from text links.
An example of affiliate text links within the content:
“Check out this golf club. I’ve been using these types of clubs for the last three months. If you want to try one, buy it for only $112 and get free shipping.”
How to get text links inside Amazon Associates:
- After logging into your account, click on “Product Links” found under the “Product Linking” tab on the black bar.
- Search for the item you want to link.
- Click the “Get Link” button to the right of the item.
- To get a short link, click on the down arrow beside the “Get Link” button and click on “Shorten URL.”
- Choose if you want Text and Image, Text Only, or Image Only and select color options and if you want it to open in a new window.
- Copy the HTML code in the box under “Get HTML Code For This Product Link.”
- Paste the HTML code into the preferred section of your website.
Banners
The easiest way to get a link on your site is by using a banner ad. However, it’s been proven not to be the most efficient way to generate sales.
An example of an Amazon banner ad:
How to get banner links inside Amazon Associates:
- After logging into your account on affiliate-program.amazon.com, click on “Banners” found under the “Product Linking” tab on the top black bar.
- Scroll down and select the category you would like to get a banner for.
- You can choose which size banner you want by clicking on the size below the category you selected, or you can scroll through the list to find the one you want.
- Copy the HTML code below the banner you want and paste it into the code for your website.
Native Shopping Ads
Native ads are also not the most effective way of collecting sales and commission. They look beautiful, but they don’t convert as well as text links. You get fewer clicks because they look like an ad.
An example of a Native Shopping Ad:
How to get Native ads links inside Amazon Associates:
- After logging into your account on affiliate-program.amazon.com, click on “Native Shopping Ads” found under the “Product Linking” tab on the top black bar.
- Choose which type of Native Shopping Ad you would like by clicking on “Create Ad Unit” and selecting from the following:
- Recommendation Ads are ads that automatically display relevant product recommendations from Amazon based on your page content and visiting users.
- Search Ads are ads that allow your visitors to take advantage of search results from Amazon directly on your website. They include product recommendations based on search phrases or keywords selected by you or entered by your visitors.
- Custom Ads let you handpick your favorite products that you would like to promote and place the ad unit within your product article posts.
- Select the Categories of items that you would like to have in your ads, as well as the Fallback (in case the item or category is unavailable at some point on Amazon.com, this will fill in) and any Advanced Settings such as size.
- Copy HTML code and paste it into the code on your website.
For more information, visit Amazon’s official page with Product Links, Banners, and Native Shopping Ads.
Choosing affiliate products to promote
People buy just about everything on Amazon. You should be able to find a good selection of related products to promote, whatever your site niche is.
The first thing you can do is check the Best Sellers page. On the left side, you can browse through Departments and pick a product category relevant to your website.
Always go with products closely related to your site niche. You can choose a broad category and niche down to the specific products to target visitors looking for particular items. This way, visitors are much more likely to click through and buy.
For example, Camera & Photo > Accessories > Bags and Cases > Filter Cases.
When it comes to what price point of items to promote, the rule of thumb is to go for middle-priced items. The low-priced items are usually easy to sell, but you receive too low of a commission. On the other hand, high-end products have much higher fees but won’t sell as easily.
This means that the best approach is to go for items around the $50 – $200 mark. At this price point, your commissions are good, and the items will be easier to sell.
Keep in mind that it’s important to promote high-quality products. So, keep an eye on the customer reviews and ratings.
What type of content to write as an Amazon affiliate
Now that you understand which products you can promote, it’s time to work on creating content that will drive visitors who are ready to buy products towards your website.
We are not going to discuss keyword research here. Instead, we will reveal what type of articles work best when it comes to making affiliate sales.
Product reviews
These are the most popular articles that people write and use to make money on Amazon. Pick any product within your niche and write a review about it.
Doing a quality review for a product related to your niche is the best way to get higher click-through rates and make affiliate sales.
This segment is also becoming more and more popular with all of the “unboxing” content that has emerged in the last few years. It’s evident that customers love reading in-depth product reviews from real people.
Example of page titles:
- Apple MacBook Air review
- Canon EOS-1D X Mark II Body review
The best products
It’s no secret…people are always looking to buy the best things available. These people are usually happy to spend more money to get the best possible goods.
Also, this type of content gets a ton of traffic if you can rank it high in search engines. Some bloggers believe that this content brings in the highest converting traffic.
Example of page titles:
- The best laptops for students 2023
- The best headphone for runners 2023
Products comparison
With so many brands and products available today, it’s not always an easy process to choose what products to buy. People need to compare products before they make their final decision. If you can provide enough information and make accurate recommendations, visitors will purchase the goods that you recommend.
Example of page titles:
- iPhone 12 vs. Galaxy S20
- Leica M10 camera vs. Canon 5D Mark IV
Sales, promotions, and discounts
Amazon has hardly any products that don’t have a listed discount. Keep an eye out for these kinds of promotions because they can be well worth promoting (if relevant to your readership).
Example of page titles:
- Cheap MacBook Pro for sale
- Get Samsung Galaxy S20 10% off coupon
How to choose
When people are planning to buy a product in a category that they never bought before, they often have tons of “newbie” questions. If you create useful “How to choose” content and walk them through picking a particular product, they will listen to your advice and make the purchase.
Example of page titles:
- How to choose the best mattress
- How to choose the best golf clubs
New products launch
Product launches are hot. There certainly is a lot of competition for writing about them, but there is an equally large amount of people consuming content about new products. If you can grab a part of a launch’s traffic and make it convert, this can easily be worth your while.
Example of page titles:
- New iPhone 12 features and prices
- New beats headphones 2023
Amazon affiliate tips and tricks
There are a few techniques that you can use to make sure that more people click on your affiliate links so that you can make more money from your Amazon affiliate program.
Use at least two affiliate links per post
Use multiple affiliate links per article you write. You can include an affiliate link every time you mention the product. Not only does it help you to get more people to Amazon, but it’s also user-friendly.
Make product images clickable
When you use pictures of the products inside your content, make sure that people can click on them. Some websites see as high as a 30% click-through rate increase when they add this functionality.
Here is an example of HTML code:
Get as many people as you can to Amazon
As we mentioned above, Amazon will give you a commission for any product that people buy through your affiliate link. So, the more people that you refer to Amazon, the more items they could order and the more money you can make.
Get ready and focus on the holidays
We all know that the holiday season is crazy for anyone who has a business that sells products (particularly physical products.) Search traffic is up, and conversion rates are higher than ever.
Make sure that you get ready for the holiday season since that’s when you can make most of your sales. Get busy two months before Christmas, but don’t forget about Black Friday and Cyber Monday.
Make sure you use proper website layout
Your website layout and design play a significant role in your Amazon affiliate’s success. There are several things you should keep in mind when you are creating your website.
- Mobile compatibility and clean design
- Easy to find affiliate links
- Use the custom WordPress theme for Amazon affiliate websites
With these things in mind, you can focus more on content creation.
Use WordPress plugins to make your life easier
If you are planning to go full force with your Amazon affiliate WordPress website or WordPress blog, you might need to use a custom plugin such as EadsyAzon. It will make your life easier and help you to find links and pictures, and post them quickly on your website.
Examples of successful Amazon affiliate websites
Finally, we would like to show you a few examples of Amazon affiliate sites that take it to the next level. Check them out and pay attention to how they embrace Amazon product offers.
Conclusion
We have shared the whole journey required when you are working on an Amazon affiliate marketing website. It is important to note that patience plays a crucial role in the whole process, as building traffic to your site takes time. However, if you take all of the steps mentioned above, it is certain that you are going to succeed over time.
With enough dedication, motivation, time, and passion, earning money as an Amazon affiliate is an option that anyone can choose.
It was suggested by a leader to join. It’s a little more than what I expected. I don’t know how to create a website. Not quite sure I understand how to get started. Not computer savvy but willing to learn. I believe I would be successful. I have great sales experience
The great thing about being an Amazon affiliate is that you can share your links before you even have a website! You can easily create and post pins on Pinterest promoting different Amazon products while you’re working on putting together your website. We just posted this article on how to use Pinterest for Blogs that will walk you through the process of signing up for Pinterest and we have a full guide on How to Start a Blog as well that will walk you through getting a website up and running!
Just what I was looking for.
I just became an Amazon affiliate and this is a great article with all the details. Thanks much!!