Today, there are dozens of website building tools available online. You have online website builders, open-source software, and some advanced offline web design tools that you can choose to create your new website.
However, no matter how popular some of these solutions are, none of them are powering more websites in the world than WordPress with more than a 40% market share.
Let’s explore how to build a website with WordPress – the most popular website builder and content management system in the world.
How to Build a Website using WordPress
- Difference between WordPress.org and WordPress.com
- Option 1: Building your website using WordPress.org (self-hosted solution)
- Option 2: Making your website on WordPress.com (hosted solution)
Before I begin this step-by-step guide, I want to explain that there are two different versions of the same platform. Although the name is the same, WordPress.org and WordPress.com are actually quite different.
Difference between WordPress.org and WordPress.com
WordPress.org is an open-source platform available for anyone to use for free.
This means that you can download the package and install WordPress locally or on any web hosting service that you like. It allows you to create any type of site you wish, practically without any restrictions. Installing plugins and themes is easy, and there are tens of thousands of free ones that will let you explore the world of website builders.
However, all of this means that you have to know what you’re doing and that you have to get your website online using your own domain name and web hosting account.
On the other hand, WordPress.com is an all-in-one platform hosted by the company behind it, Automattic.
It’s similar to many popular website builders like Wix, Squarespace, or Weebly, and allows you to focus on the process of building a website. Although there is a free WordPress.com version, you will probably need other features and customization options that are only available in their paid plans (like installing plugins). Many restrictions disappear only if you are opt-in for their more expensive plans.
The downside of using WordPress.com is that you are getting stuck with that one platform and have to follow their terms of services. But, with WordPress.org you have full control of your website and are able to customize it the way you want to.
Since we have already discussed the differences, you can see more details about the platforms here.
Price and features comparison table
If this is your first time reading about WordPress, it may be hard to grasp all of the differences and decide which one to choose for your first website. I created a simple table that will show you some of the most important features you get or don’t get with the platform along with the prices to help you out.
| WordPress.org (Bluehost) | WordPress.com (Free) | WordPress.com (Pro) | ||
| Price | $2.75 per month | Free | $15 per month | |
| Domain | Custom domain name | WordPress.com Subdomain | Custom domain name | |
| Storage | 50GB | 1GB | 50GB | |
| Design Customization | Complete customization | Basic | Advanced | |
| Monetization | Full freedom | Limited | Full freedom | |
| Support | 24/7 support | Community support | Email & Live Chat Support |
Option 1: Building your website using WordPress.org
Creating a website with WordPress.org is a good choice. The learning curve is definitely steeper than any other website builder (even WordPress.com), but it’s much more rewarding.
If you invest enough time into learning and exploring the self-hosted WordPress, you will realize that the possibilities are endless. And if you decide to spend a few bucks on premium themes and plugins, you will be able to create practically any kind of website that you can imagine.
Starting a website with WordPress means that you have to find a hosting service. This service will rent a disk space to you where you will store your website, as well as any services needed for everything to run smoothly.
One of the best hosting services for WordPress is Bluehost. And this isn’t just my opinion. It’s also one of the few services officially recommended by WordPress. Thus, I’ll be using this company as an example in this tutorial.
1. Go to the Bluehost website
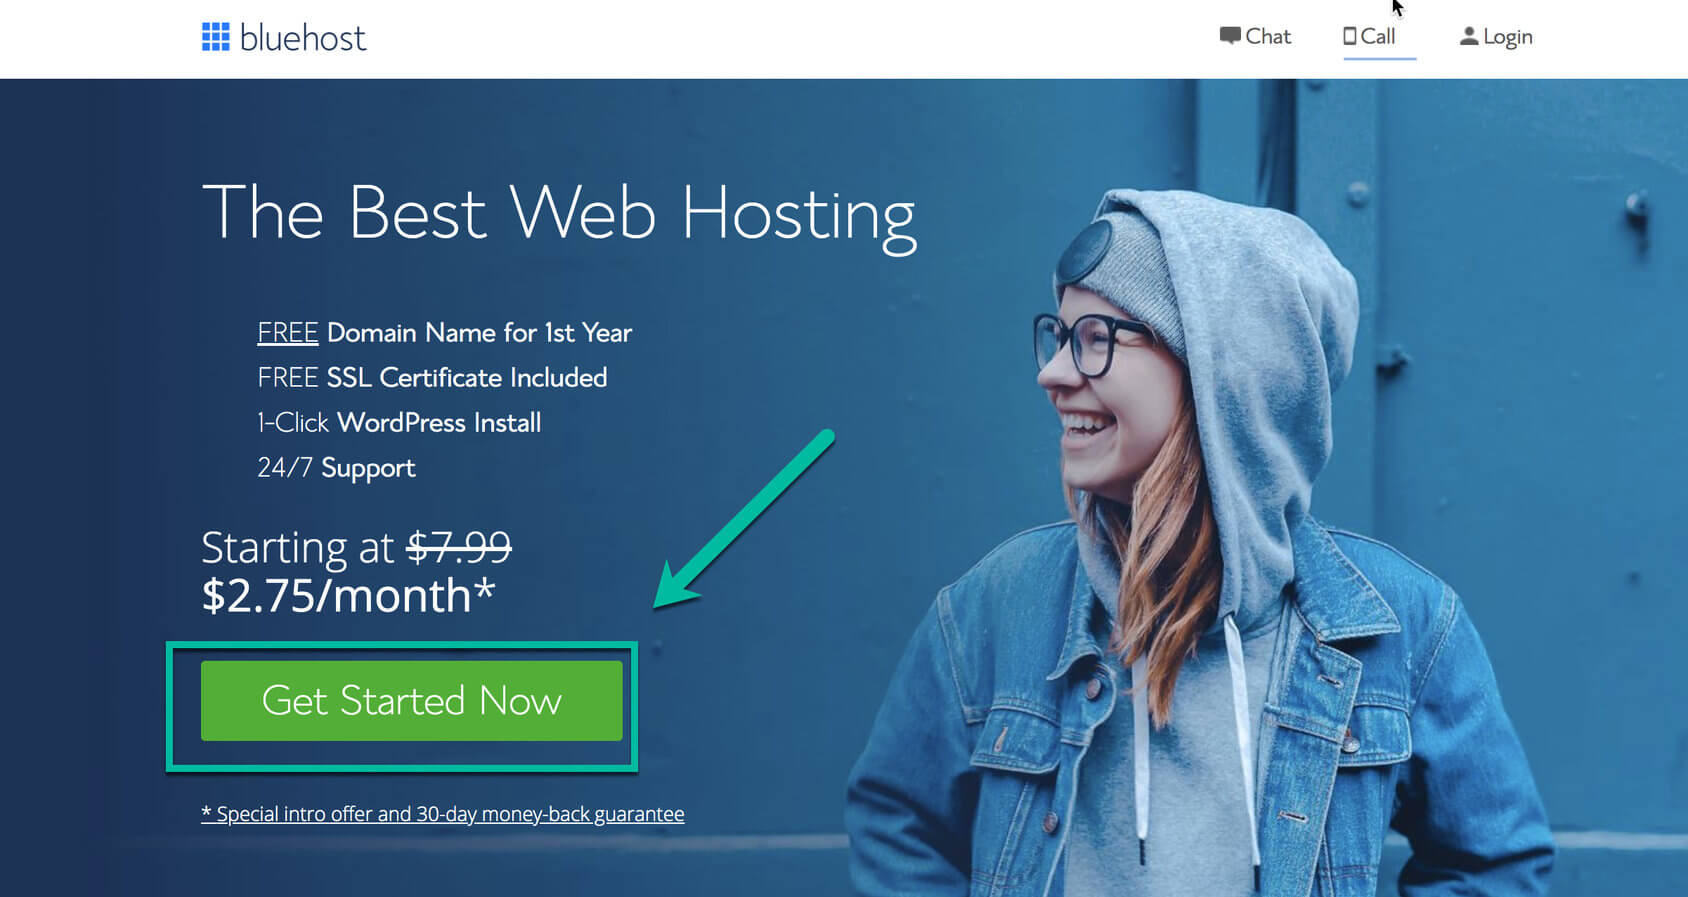
Open your favorite web browser, and navigate to Bluehost.com. Click on the “Get Started Now” button.
2. Choose a hosting plan
There are several plans that you can start with. If you are not sure which plan is best for you, simply choose the Basic one that’s available at $2.75/month. Everything you get with the Basic plan will be more than sufficient for starting a website.
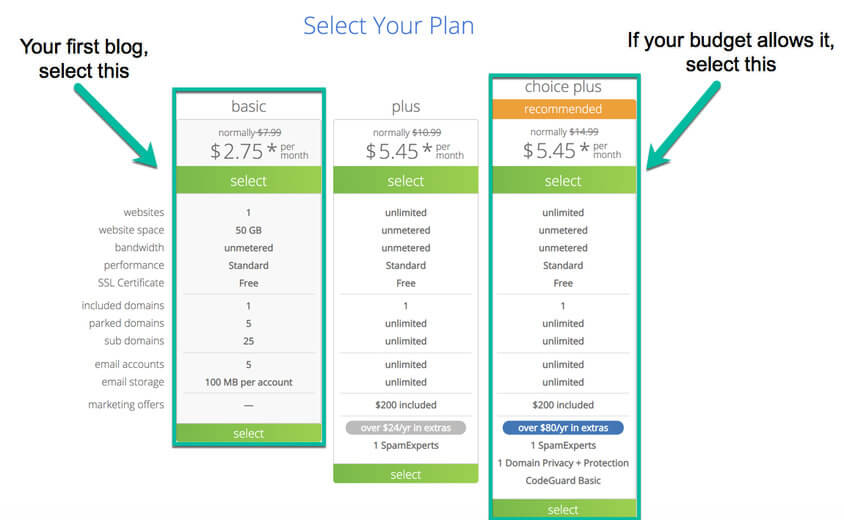
If you realize that you need more storage, bandwidth, or anything else, you can easily upgrade your plan at any point in the future.
3. Input a domain name
A domain name is an address to your website. It should be connected to your hosting, so that people can see what you’ve built when opening it in their web browser.
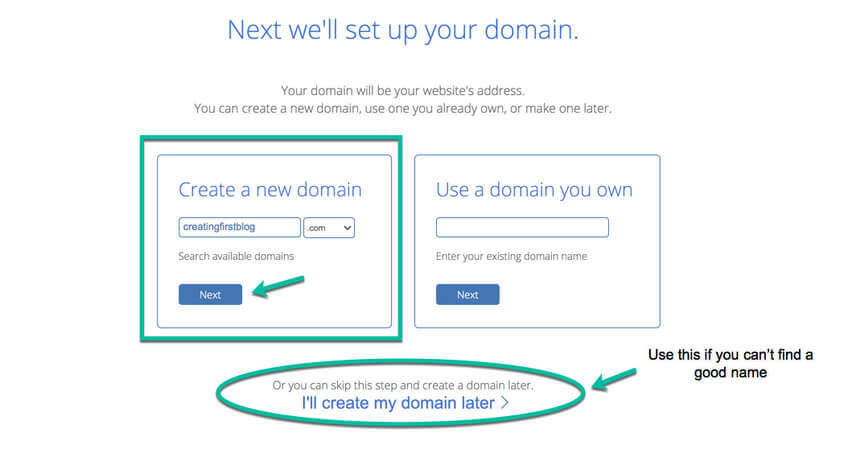
This is the moment when you should choose and register a new domain name for your website. Simply type in your desired name and select the extension from the list available on the right side.
Be patient, and find a domain that you really like. Although it is technically possible to switch domain names in the future, this is not something I would recommend. I know it’s hard to commit to a single domain name now, but take your time, as this is probably a domain name you will recognize your site by permanently.
Once you’re happy with your domain name, click on the “Next” button. At this moment, Bluehost will check it for availability. Be prepared for a few disappointments, because there is a high chance that your preferred domain name is already taken. After finding an available domain name, you can proceed to the next step.
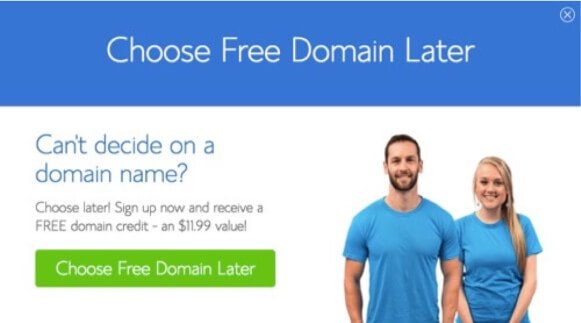
If you are out of ideas, don’t worry. You can always skip this step and register your domain name later.
4. Register your Bluehost account
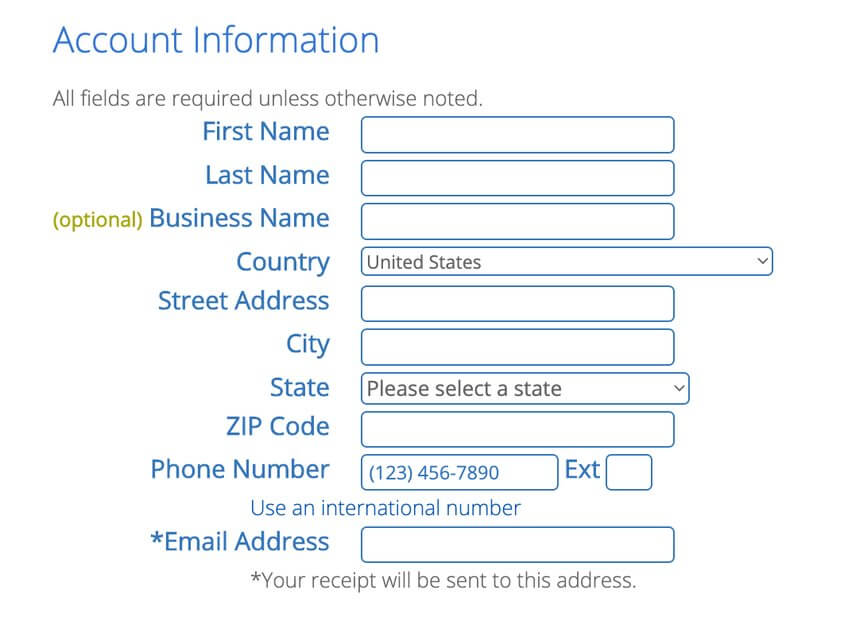
Before proceeding, you’ll just have to fill out a few fields pertaining to your personal and billing information.
5. Hosting options
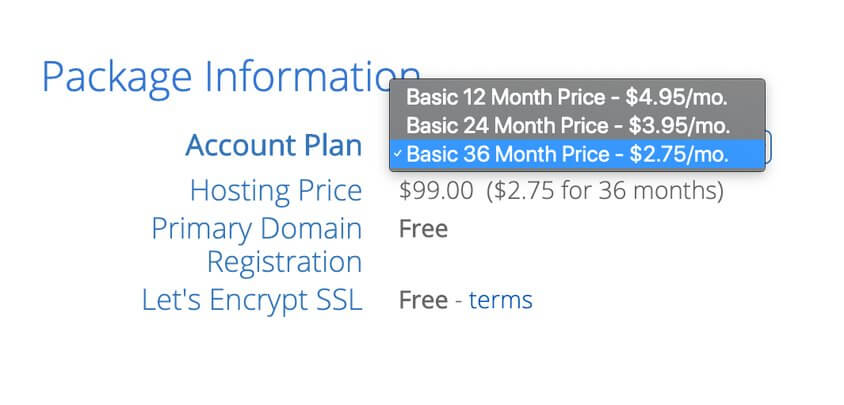
Although the one-year plan sounds appealing already, Bluehost also gives you a few more options to choose from. If you are 100% sure about your site for the long haul, you can pay for more than one year and forget about paying website hosting fees for the immediate future.
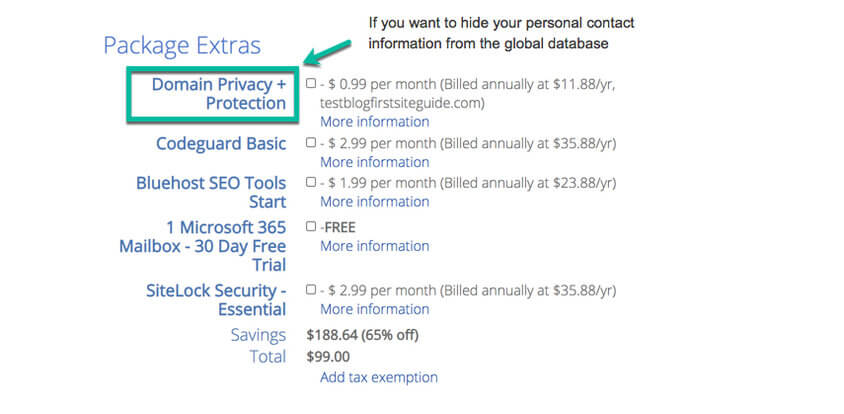
Feel free to skip all of the other options at this point if you’re not sure if you need them. It is always possible to activate or deactivate them through your account at a later point.
6. Create your account
It’s time to create your Bluehost account. Just like with any other service, Bluehost requires you to create a new password that you will use to log in. Make sure that you’re choosing a strong password that no one can guess easily.
7. Log in to your new account
That’s it! Your account is ready, and you can log in to start working on your brand new website.
8. Choose your WordPress theme
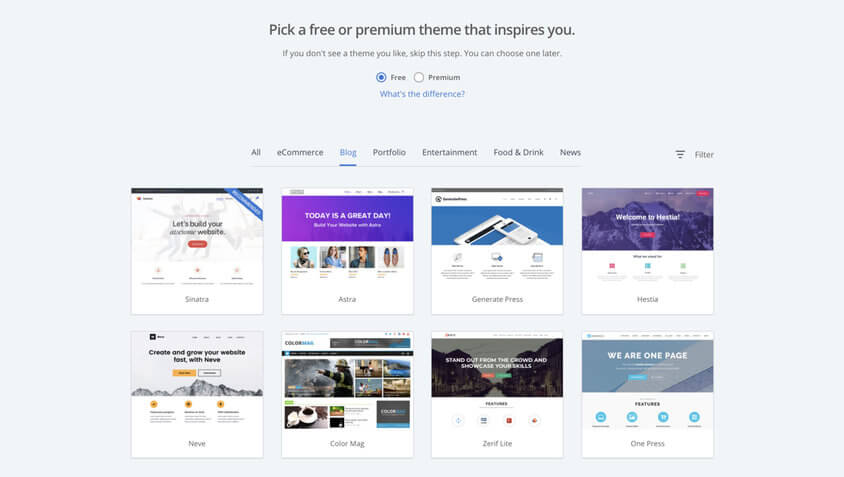
For a quicker start, you should choose a theme. A theme defines the look of your site, so you should find something that you really like. If you don’t love any of the first ones offered to you, there are thousands of different ones available on the official WordPress repository. Themes can also be switched anytime.
9. Launch your website
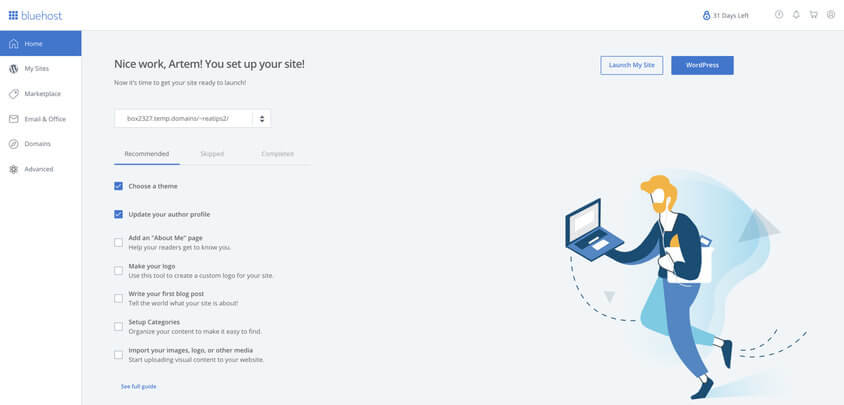
After you have selected a theme, Bluehost will show you a welcome message. You can proceed by following their simple guide.
Congratulations! You have a new website powered by WordPress. Now it’s time to start exploring and modifying the theme, finding plugins that will extend your website’s functionalities, and making it personal.
10. Modifying a site
A self-hosted WordPress website comes with a default editor known as Gutenberg. This editor allows you to modify each and every page of your website. It is possible to add or remove elements (blocks), change content, add images, videos, and much more.
To begin with, you will need to modify your homepage (front page). This is the main page of your site, where most people land, so you have to make it look beautiful and personal.
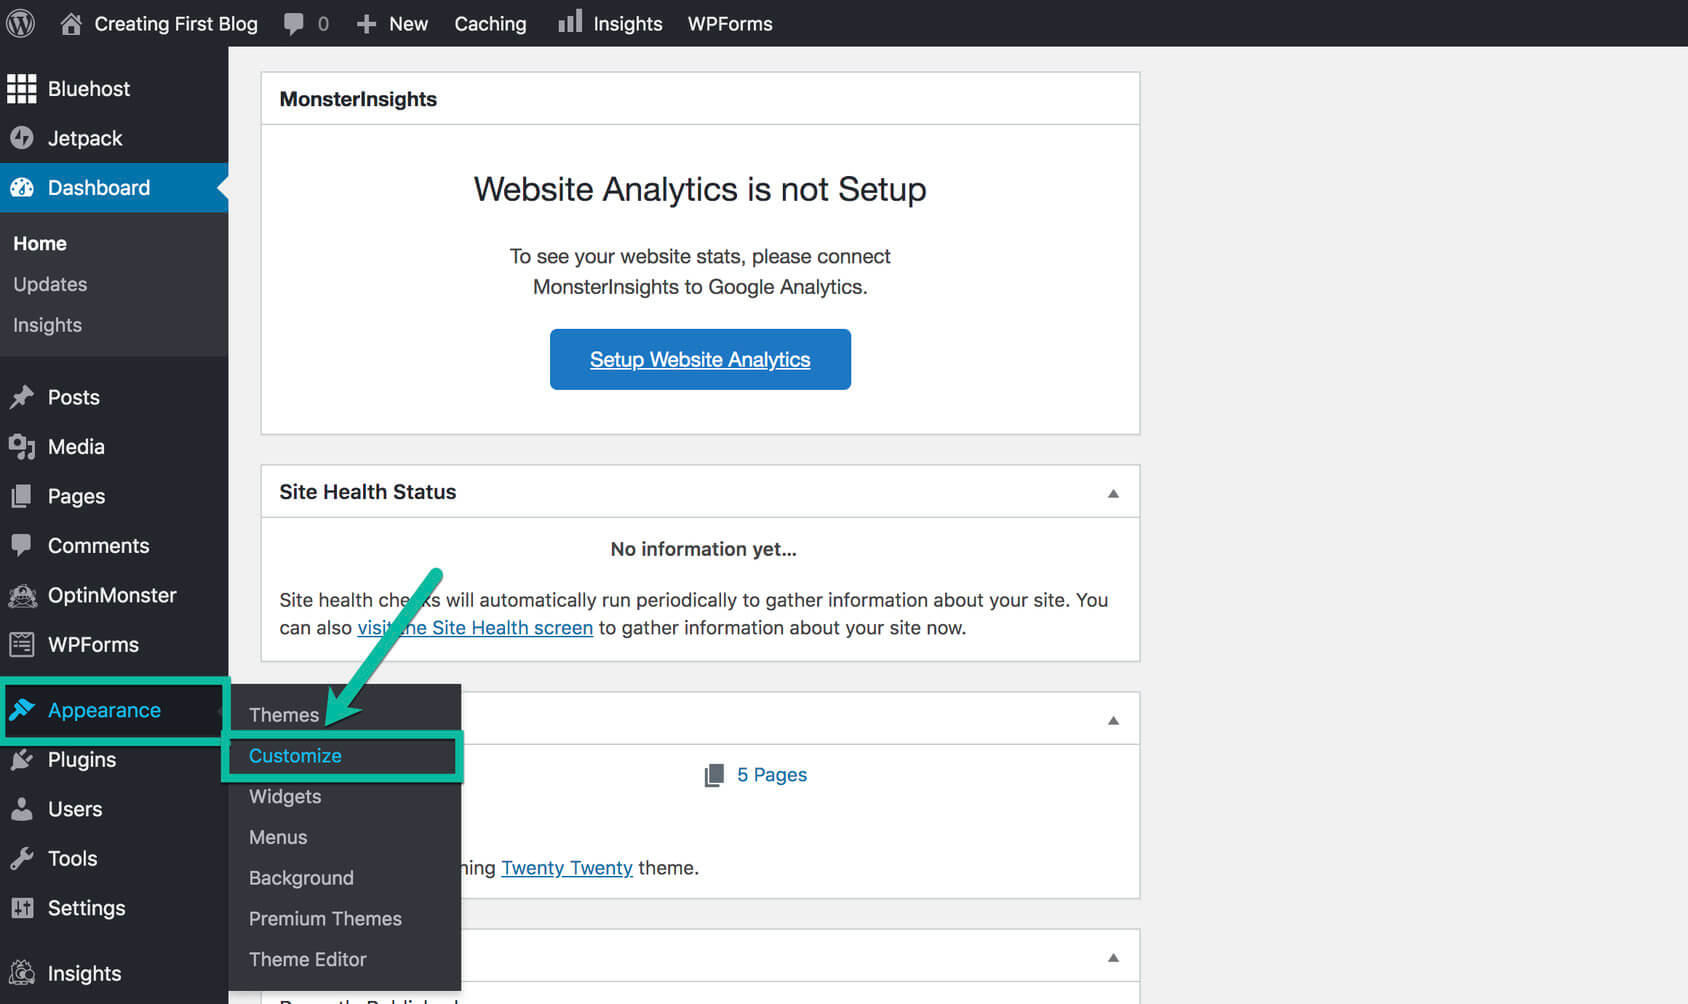
1. While you’re logged in, go to your homepage by opening your domain
2. From the top bar, click the “Appearance” button and then choose the “Customize” button.
This will open the editor, showing your website with all of the available options. Depending on your chosen theme, your site might look different than what I have here, but the options are basically the same. To start modifying your website, click on any element to reveal a set of options.
Here you can change things like cover templates, backgrounds, theme options, menus, widgets, and so on. This is also where you can select a different page to act as your homepage. Then, you can use Gutenberg to edit the page in detail.
For most of the elements, you will be able to set different background colors, images, or videos. You can also select how big a feature is by changing its margins and paddings, adding borders, modifying shadows, animations, and more.
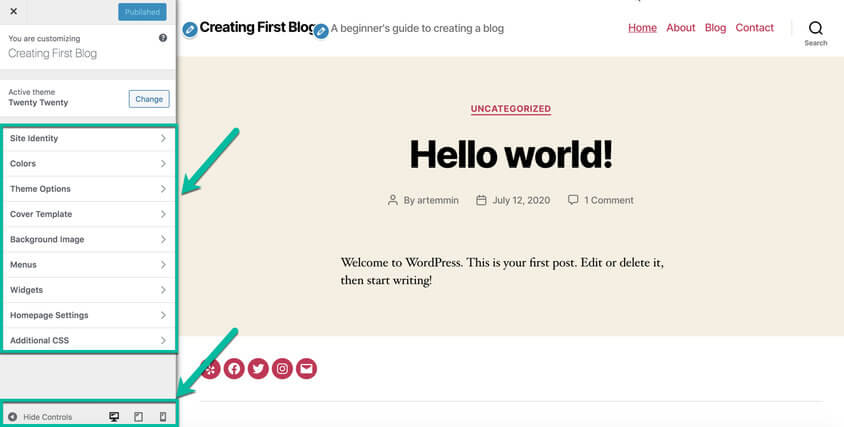
Each element has its own set of options. For example, if you click on the text element, you could change its font, formatting, colors, alignment, and much more. Don’t be afraid to click around and explore what you have available to you. Gutenberg comes with an undo option, so you can always revert changes by clicking on the little arrow pointing to the left in the top bar.
By clicking the Plus icon on the same top bar, you will reveal an entirely new menu on the left-hand side of the screen. Here you can choose to add a new element like paragraphs, heading, tables, lists, images, buttons, and so on.
This is where you can show your creativity, so take your time and prepare to spend time on this before actually learning to move around Gutenberg.
11. Installing Plugins
One of the most important things to note about WordPress is that you can easily extend your site by installing plugins. These little pieces of code can be downloaded from the official repository for free, and there are more than 50,000 plugins available. No, that’s not a typo. If that’s not enough, you can always purchase one of the thousands of premium plugins that can do wonders to your site.
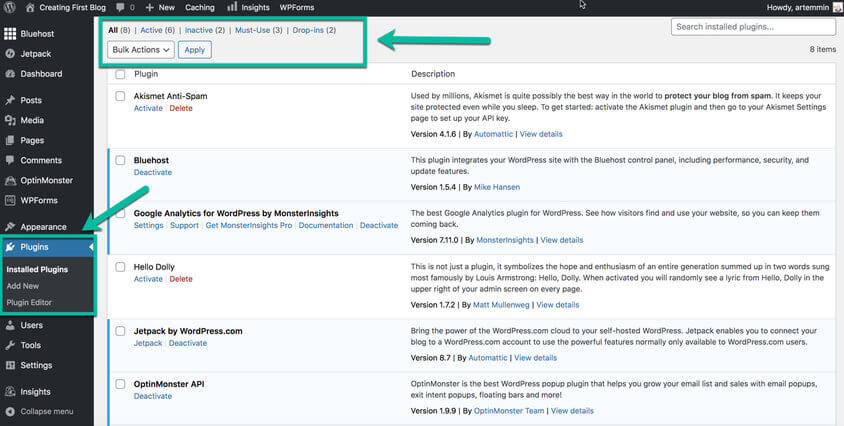
Whether you want to install additional Gutenberg elements, improve your site’s security, make it look better, change the way users are handled, your options are endless. There’s practically a plugin for anything you can imagine.
- To start exploring, navigate to Plugins from your dashboard.
- Click the “Add New” button.
- Browse through the list of plugins (featured, popular, recommended) or type in a keyword and search for a plugin.
- Click on the “Install Now” button to install a specific plugin.
- Click on the “Activate” button to complete the installation.
Plugins differ, and depending on the plugin you have installed, you can expect its settings to be in different places. Some plugins will be available directly from the main menu on the dashboard, while the others will be accessible through the Settings or the Tools options. There are even plugins without any extra settings! This is something you will have to explore on your own.
Once you find the plugin’s settings, you should spend some time modifying them.
12. Publishing your first post
WordPress has become so popular mainly because it was recognized as the best blogging platform. Although you can create any kind of website you want with their software, blogging has remained one of its most vital features. Let me show you how to publish your first post.
- From the dashboard, go to Posts -> Add New.
- Write the title of your post by clicking on the “Add title.”
- Click below the title to start adding content.
By default, you can start writing your first paragraph. However, when you decide to add more content, you can always click on the little blue “plus” icon on top of the page that will open the menu and let you select a new block. Here you can find anything you want, just like when you edit your site.
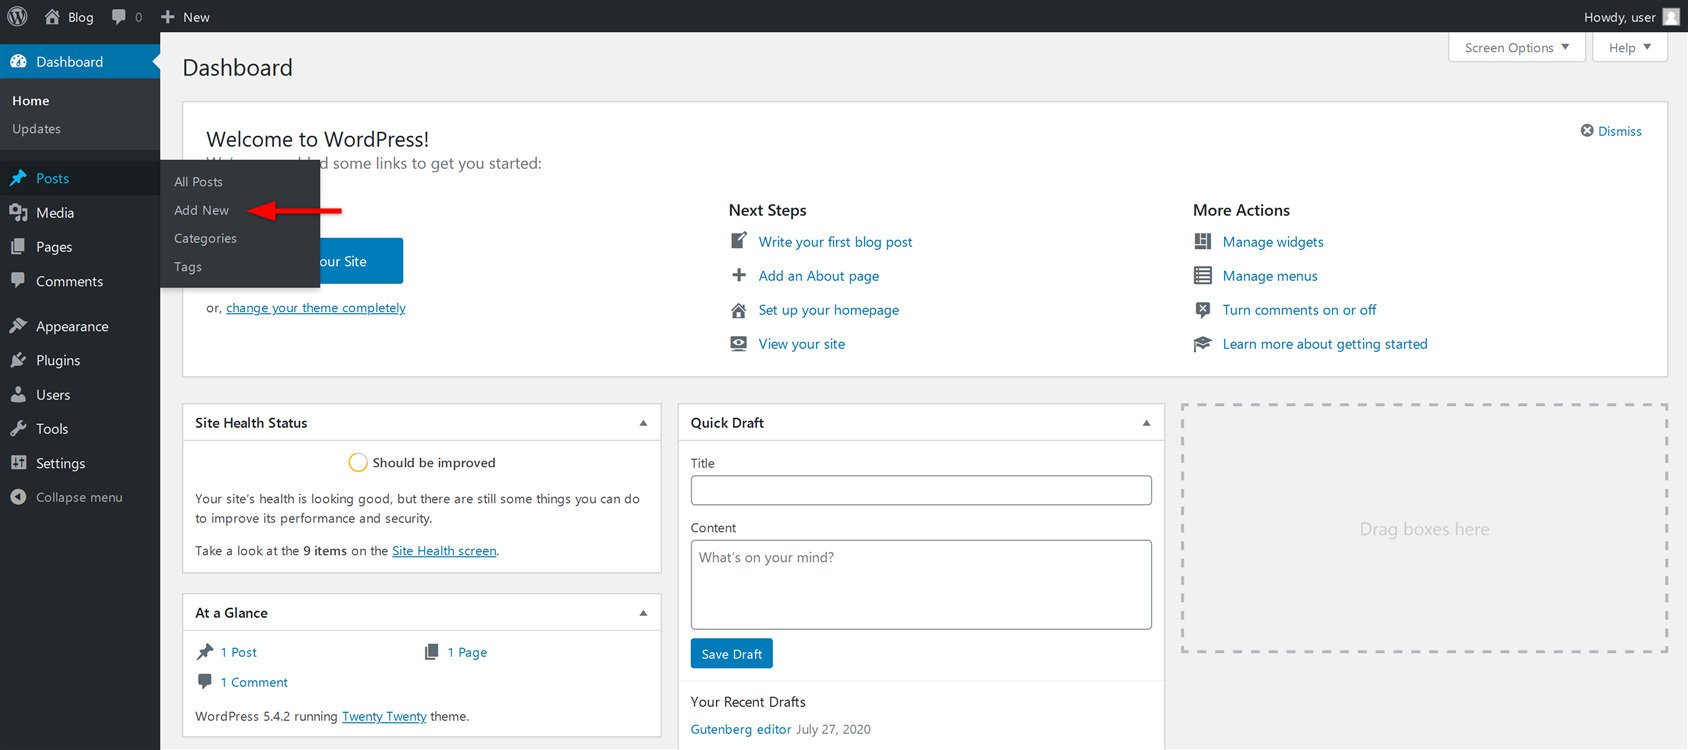
If you install additional plugins that have Gutenberg blocks available, you will be able to find them via the menu and insert more options into your blog posts. Take your time and explore all of the blocks and options available on the page.
Once you finish composing your first post, you can preview it by clicking on the “Preview” button from the top-right corner of the page. This is what your post will look like to the public. Once you’re happy with it and ready to make it public, click on the “Publish” button.
Option 2: Making your website on WordPress.com
Creating a website with WordPress.org gives you complete freedom. While I have tried to sum it up in these easy steps, please note that I am just scratching the surface. Creating a fully functioning and beautiful website will take more time and learning.
If you do not have a lot of time or are simply not interested in creating the entire thing, you can always go for a WordPress.com website. With it, you can create your account for free and completely avoid issues like hosting and domains. Also, you can have the entire website ready for you in less than five minutes.
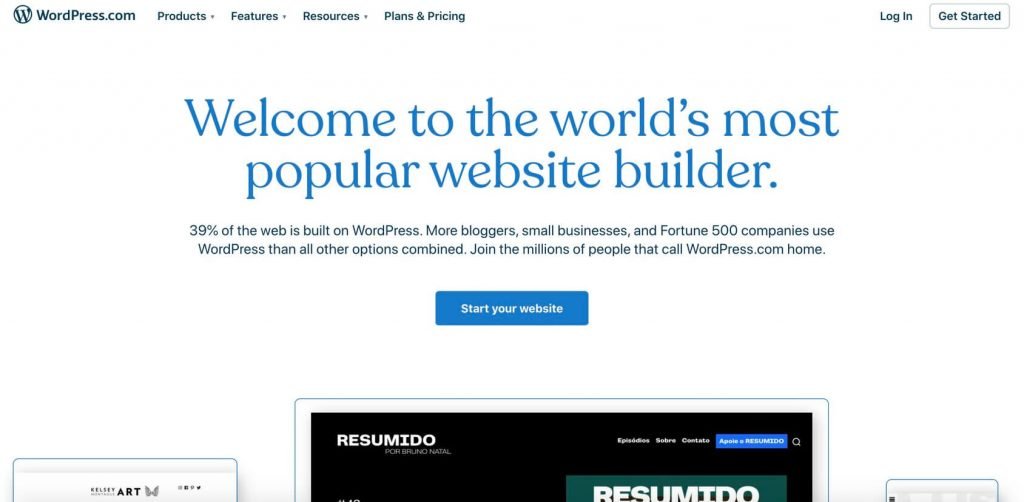
1. Go to WordPress.com website.
- Click on the “Start your website” button.
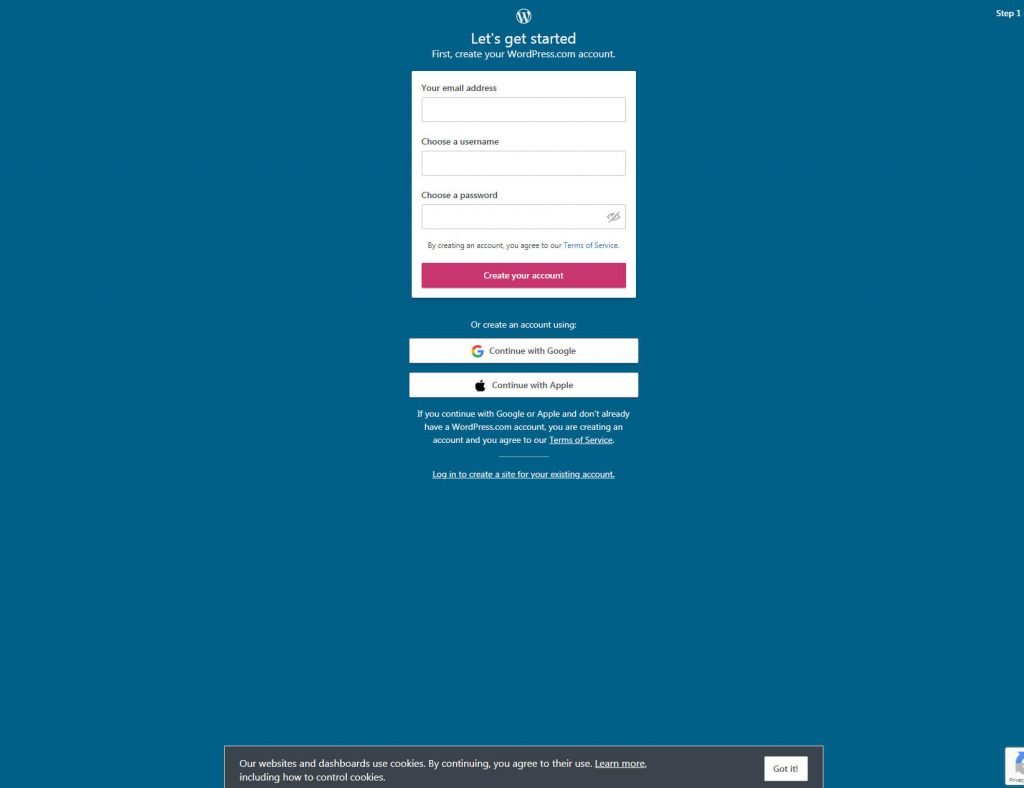
- Type in your email address, and choose a username and password.
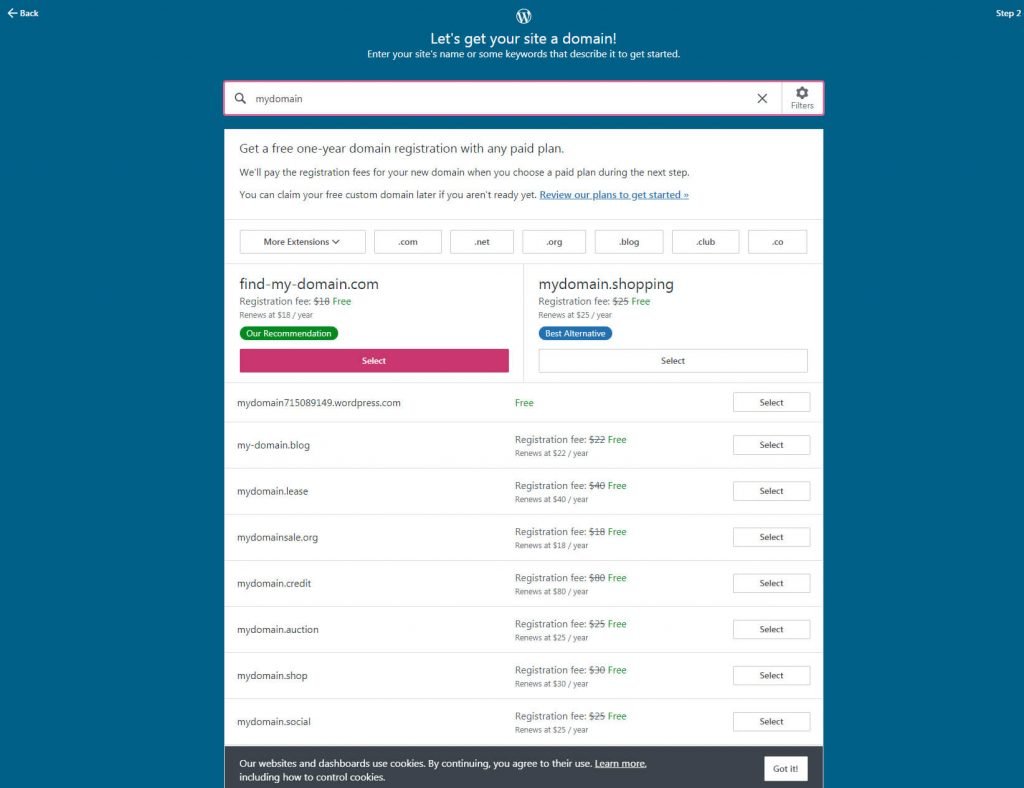
- Choose a domain name (you can choose a free one).
- Click on the “Start with a free site” button.
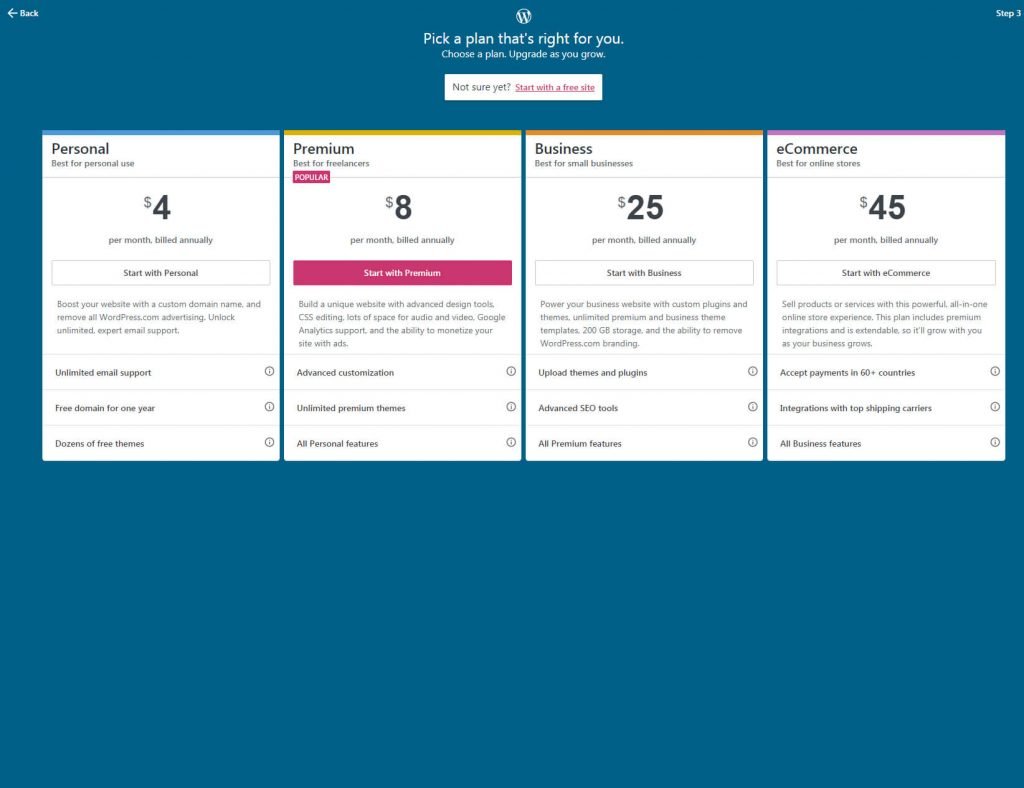
WordPress.com will now consider all of your options and start preparing your site. In just a few seconds, you should have your free account ready and your website prepared for personalization.
If this is your first time with the platform, you might feel overwhelmed by all of the options on the dashboard. But take it slow. Click on the “Get started” button, and WordPress will guide you through the setup.
2. Name your site
WordPress will open the Settings where you can choose your site title and its tagline by clicking the button. Both are important, as your visitors and search engines will be able to see the information. You can also add your site icon and set a few other options.
3. Update your Home page
This is the most creative step. WordPress will open your website in an editor after clicking the button, and then you get to modify its appearance and overall design. To change an element, simply click on it, and WordPress will reveal several options. Where it’s possible to add new features, you will find a simple “plus” icon. You can choose from an array of elements like text, list, images, buttons, and so on. As soon as you click on an element, it will appear on your homepage, where you can continue working with its settings.
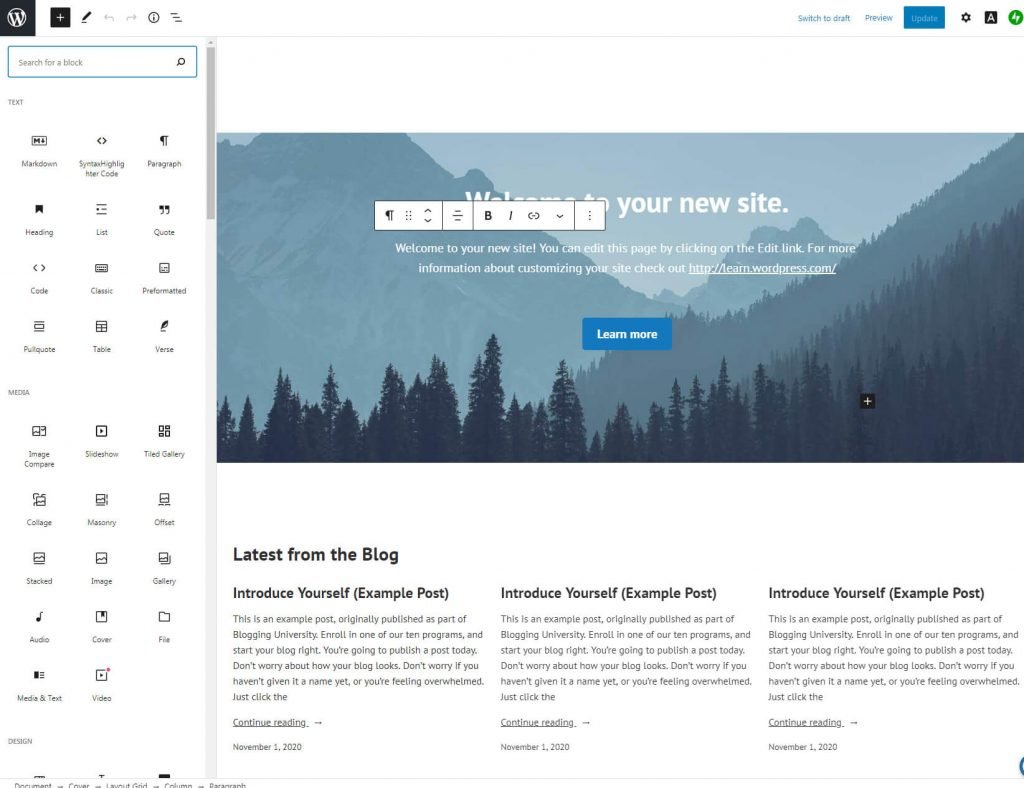
Keep scrolling down your site, and change each and every element until you have a homepage you love. Depending on what you want to create, it may take only twenty minutes or as long as twenty days to complete everything.
At any moment, you can preview your site by clicking the “preview” button at the top of the page and update it by clicking the “update” button.
4. Confirm your email address
Although this step doesn’t have anything to do with your website’s name, you should confirm your email address as soon as possible. You will not be able to publish your site until this step is completed.
5. Create a site menu
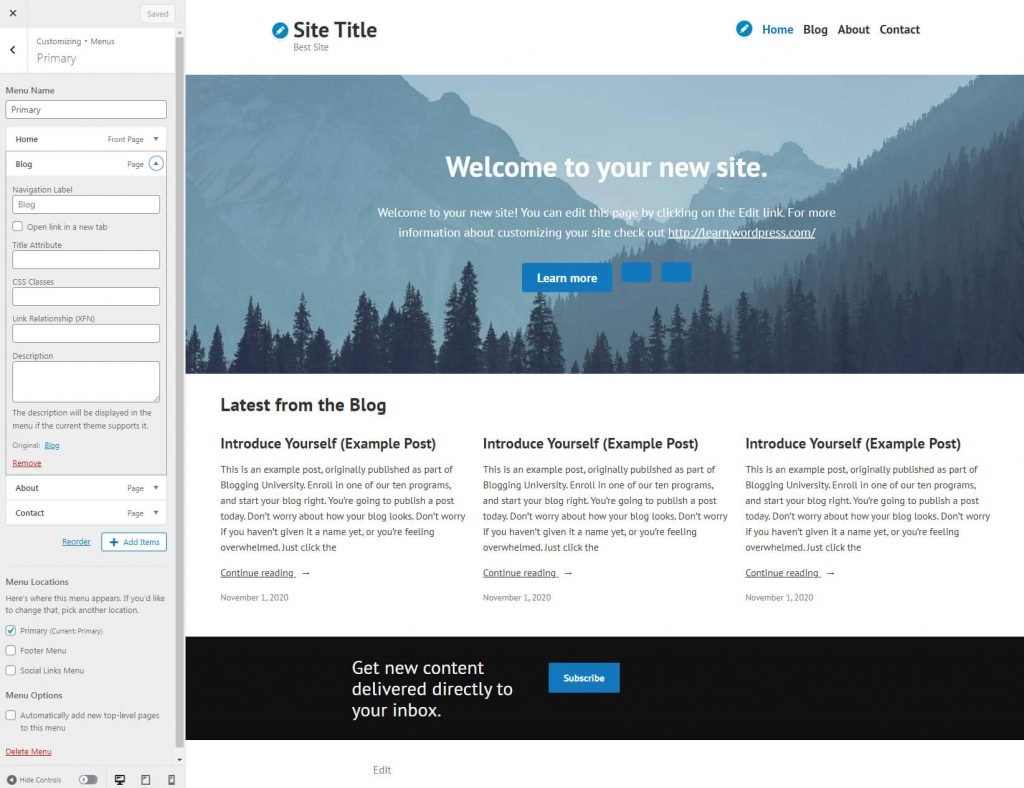
Navigation is an essential part of every site. Click on the button to launch the editor and open “menus” from the screen’s left-hand side. Choose to edit your primary menu.
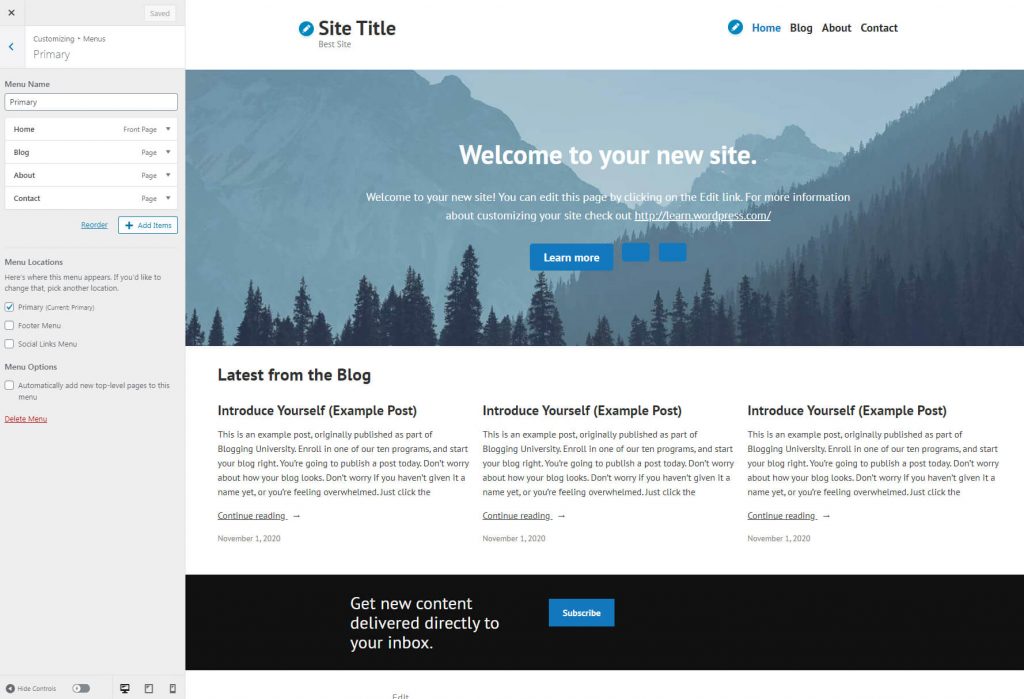
By default, you will have a few menu items that can be quickly modified. There is “Home,” which is your front page, as well as several pages that are already linked. Feel free to click on each item to open more options.
Since you’re just starting out, you should focus on adding or removing items and changing their labels. Just forget about the other options for now if you’re not sure what they’re supposed to do. It is possible to quickly reorder elements by clicking the “Reorder” button while clicking the “Add Items” button allows you to add more pages or links to the menu.
6. Launch your website
One of the last things left to complete from the setup list is to launch your site. If you have confirmed your email address in the previously mentioned step, simply click the “Launch site” button to make it available to the public.
7. Get the WordPress app
If you want to manage your new website via your phone, download the official WordPress.com app. It will allow you to control the basics and follow your stats on the go. This step isn’t mandatory, so feel free to skip it for now, as you can always get the app whenever you feel ready for it. Enjoy your site!
Conclusion
WordPress is definitely the most popular content management system in the world. However, as we have explained, there are two versions to choose from, and they are quite different.
While WordPress.org gives you the power to build practically anything you want, it takes more time to set it up and get your website launched. On the other hand, WordPress.com is easier to start and work with but comes with some limitations.
No matter which one you choose, take your time to learn your selected platform and enjoy your new website.

