
This guide was developed to take the mystery out of search engines – how they function and how to make your WordPress website optimized for SEO using the best practices.
To help you with WordPress SEO, we will cover search engine optimization (SEO) basics, how they should be applied to websites, web design, and online content.
After you finish reading this guide, you’ll be fully acquainted with the WordPress SEO process, and you’ll understand a large portion of the mechanics behind it.
Table of contents
- What is SEO?
- Basic WordPress SEO settings
- Optimize WordPress website for SEO (best practices)
- Must have WordPress SEO plugins
- On-page and off-page SEO ranking factors
- SEO techniques for WordPress websites
- Conclusion
What is SEO?
SEO is the method of increasing a website’s visibility and ranking on search engine results pages. SEO helps us to create sites that are more search-engine friendly and that deliver a better user experience.
Many things influence a website’s visibility, including design, on-page keywords, and links. Furthermore, a lot of the elements of SEO aren’t well known. As a result, people can’t take full advantage of SEO to improve the ranking of their websites and content.
It’s important to keep in mind that search engines use algorithms that are still growing and developing. Also, search engine updates are created to help search engines deliver higher quality results.
How SEO works
To explain it in simple terms, SEO works on the following principle.
- You make a website and decide which parts of your website you want to be visible to the search engine.
- The search engine sends “web crawlers” to gather input on your website and its pages.
- The search engine uses this input to evaluate the quality of your content and your website as a whole.
- Based on that evaluation, your website gains an initial ranking.
Every time you send new ranking signals, the crawlers will revisit your page and update the information in the database. It can either improve or reduce your site’s ranking based on the quality of the newly discovered data.
Why SEO is important
You have a purpose for creating your website, and you want people to be able to find it. Knowing SEO can help you to build your audience. You’ll know what design elements to prioritize and learn how to create content that will have high exposure and offer satisfying quality for your visitors.
Also, without SEO, all your hard work will be for nothing since having a website with limited visibility is almost as bad as having no website at all. Finally, if you don’t have enough visitors, knowing SEO can help you to figure out exactly why your site lacks visibility and guide you in taking steps to improve your rankings.
Basic WordPress SEO settings
WordPress comes with some SEO settings that you can use instantly to improve the ranking of your website.
Here are the three basic WordPress SEO settings that you should configure the moment you log into your dashboard.
Check WordPress site settings
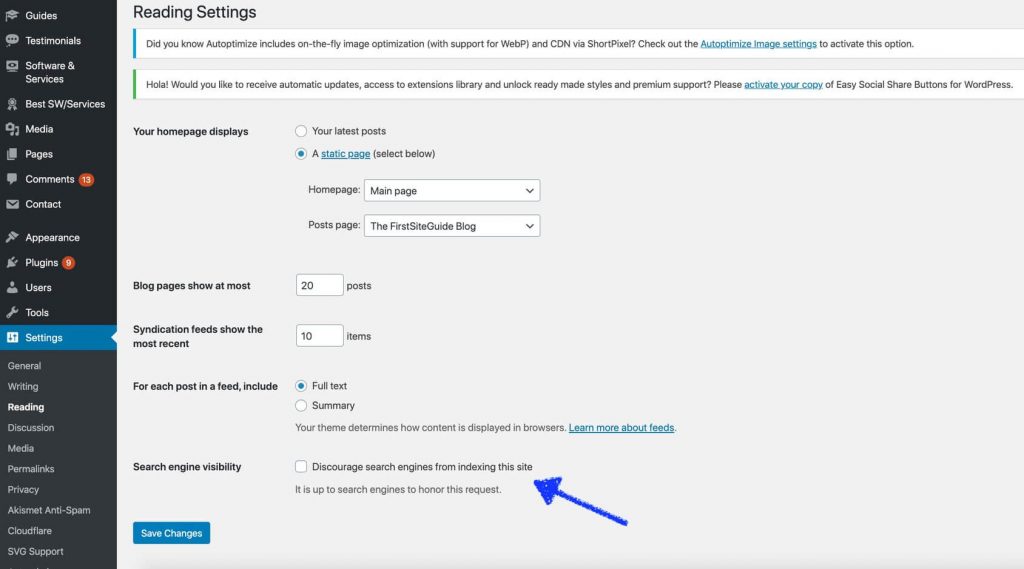
Did you know that WordPress has a built-in option that allows users to discourage search engines from crawling your website? To ensure your site appears in the search results, you need to make sure that it is not switched on.
You can access the setting via Settings > Reading. Find the “Search Engine Visibility” setting and make sure that you didn’t check the box in front of it.
Set correct permalinks (URLs) structure
Every webpage and blog post on your website has a permalink. From an SEO perspective, your permalinks are essential to your SEO success. Search engines use words in permalinks to understand what the page is all about.
You can nudge search engines in the right direction if you add your target keywords to permalinks. However, the default WordPress setting doesn’t allow you to use a custom permalinks structure. You are stuck with the “Day and name” setting unless you change it manually.
To set the correct permalinks structure, head to Settings > Permalinks.
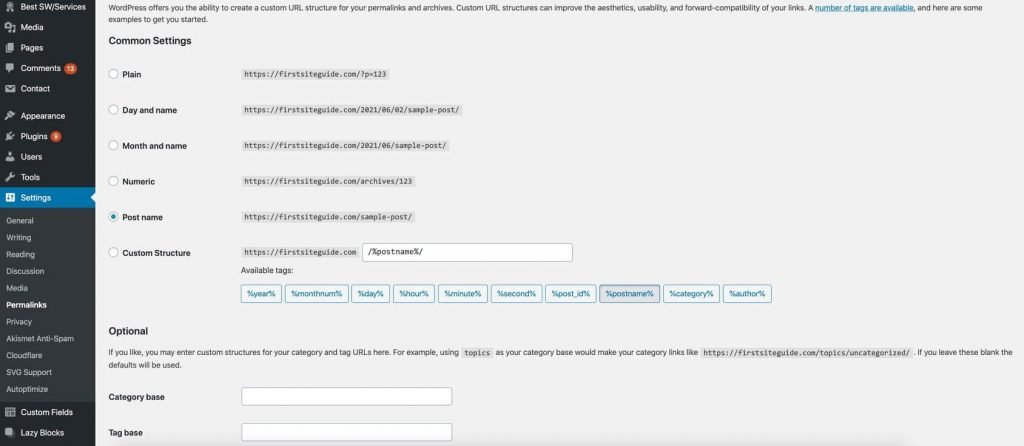
The go-to option for many SEO-aware WordPress users is “Post name”. WordPress has a built-in capacity to use the content on your webpage and automatically suggest the best permalink for that page. It even filters out unnecessary words to make permalinks shorter while making no sacrifices to semantics.
Check WordPress site health
As of version 5.2, WordPress is offered with a great feature called Site Health, followed by the site health status widget in the 5.4 version.
This is a built-in feature able to monitor the health of your site and notify you if you need to make some changes to improve it. You can access the site health feature via Tools > Site Health from your WordPress dashboard.
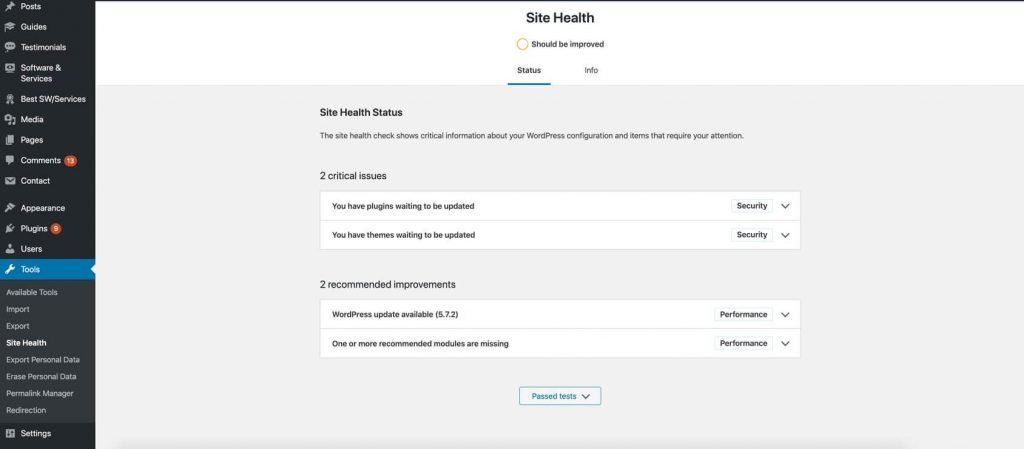
In terms of SEO, the site health feature is important as it can point out some updates and fixes to issues that can jeopardize your site’s rank in the long run. For instance, a security fix can prevent hackers from exploiting your site’s vulnerabilities, an issue that can result in search engine penalties.
The Site Health tool can discover problems that range from a missing SSL certificate to missing essential WordPress updates.
Optimize WordPress website for SEO (best practices)
Once you are done with fine-tuning the basic WordPress site settings, you are ready to step up your game. Here are the best SEO practices that you can apply to your website.
Organize and optimize your content
WordPress has two great perks to help you organize your content better: categories and tags. You can use them to give some logic to how the content on your website is organized.
Create categories for different topics that you address on your site. Once you have the categories, put all of your posts under a common topic in one category. Tags are there to help you organize your content by sub-topics. They describe the details about your posts.
Every post on WordPress has to belong to a category. Tags are completely optional. If you don’t assign a category to your post, WordPress will automatically assign it to the “Uncategorized” category.
You can create categories and tags via Posts > Categories and Posts > Tags.

Categories are important because you can use them to create even more meaningful and SEO-friendly permalinks. To do this, you need to go to Settings > Permalinks, select “Custom Structure”, and type in /%category%/%postname%/.
Organizing your content for best usability is a strong SEO signal. Your visitors will be delighted with how easy it is to navigate your website. They will spend more time on it, and you will get better SEO rankings.
Establish a proper website structure
While usability and functionality of your site are important, we need to address website structure too. Proper website structure is important for three reasons.
First, a good structure will make it easier for you to navigate your website maze and work on it once it starts rapidly growing. Secondly, your visitors will appreciate how easy it is to navigate.
Finally, and most importantly, web crawlers sent by search engines will have an easier time crawling your web pages. They can discover where your content is located and add your permalinks to search results.
Every WordPress structure consists of these five essential elements:
- Header navigation menu – this is the main navigation menu that you should use to organize your main pages, blog categories, subcategories, and so on.
- Sidebar navigation – sidebar navigation is commonly seen on eCommerce websites. Its main purpose is to facilitate navigation and content finding for your visitors.
- Footer navigation – this section often holds links to policies, terms, company information, and more.
- Pages – pages enable you to organize your content more effectively. For instance, you can add child pages under a parent page to make navigation more logical.
- Blog categories – these are quite important if you plan on regularly adding new blog posts. With categories, you can make your entire permalink effort easier and help visitors find blogs faster.
Before you start building anything in your dashboard, make a spreadsheet. Start with the homepage at the top and work downward, adding category pages. At this stage, you can plan your internal linking strategy. Keep in mind that search engines prioritize web pages with more internal links leading to them.
When you are done with the spreadsheet, you can go and create your web pages and categories. As a final step, create and submit an XML sitemap to Google Search Console. This will allow Google to properly crawl and index your blog or website.
Create and write quality content
While setting WordPress up for SEO is essential, it is only a fraction of a strong SEO strategy. You will need to create and write quality content with SEO in mind. “SEO in mind” refers to doing keyword research and finding the most relevant keywords for your target audience. Then you can use the keywords that you have identified to create a content strategy.
To write quality content, you should never sacrifice the value of content for quantity and publishing frequency. While using the targeted keywords, you should also ensure to write well-researched, original, and engaging content.
At the start, you can add one valuable piece of content per week. Search engines will see your site as active, which is a strong SEO signal. Also, over time you’ll have more content online, and search engines will be able to use it to better assess your site’s rank.
Optimize your WordPress website performance
For a website to climb ranks in the search engine result pages, it has to perform extremely well. The following tips will help you to boost your WordPress website performance and improve SEO.
Make your website mobile-friendly
Did you know that there are over 4.3 billion active mobile internet users? Meanwhile, over 60% of Google searches originate from mobile devices. Search engines, including Google, decided that responsive design is a strong SEO signal.
You should definitely make sure that your site performs exceptionally well both on desktop computers and mobile devices. With WordPress, you just need to use a mobile-friendly WordPress theme, and you are set.
Make your website secure
Google, or any other search engine for that matter, doesn’t want to direct its users to websites that pose a threat to their online security. Website security is not only an SEO factor but something that can backfire on you and get your website penalized and excluded from search results. There are a few things that you can do to make your WordPress site super-secure:
- Regularly update WordPress, plugins, and theme;
- Use SSL certificates to enable HTTPS encrypted connections;
- Use a strong admin password (12 characters, CAPS letters, numbers, and special symbols);
- Choose a secure hosting provider; and
- Change login URL (install fee WPS Hide Login plugin, hit Settings > WPS Hide Login, and change login URL).
Make your website load fast
Google also takes your website load speed as a ranking factor. Fast loading speed ensures a premium user experience and makes browsing your website across all devices more enjoyable. You can use one of the many online speed testing tools, such as Pingdom, to check your loading speed. It’s great for the beginner as it outlines performance grade, load time, and what your site does poorly.
Some of the resulting suggestions might be too technical for you to carry out yourself, but what you can do on your end is to:
- Optimize images for faster loading times;
- Install and use a free or WordPress caching plugin (WP Super Cache is a solid choice, and it’s free);
- Split blog comments into pages (Settings > Discussion > Break comments into pages); and
- Don’t upload video or audio files directly – use embedding instead.
Make your website usability perfect
We have already addressed usability in the website structure section. The best practice is to keep things simple. You should always test your site for usability. Check how many actions a visitor has to perform to trigger certain features or find content – the fewer actions they have to perform, the better.
Don’t forget to test usability on mobile devices as well. The user experience should be consistent across all screen sizes. Furthermore, take into consideration white space, colors, and fonts as they all add to the site’s aesthetics and are major factors of usability.
Make sure that you track performance
What many website owners and managers fail to understand is that website performance optimization is an ongoing effort. You can’t just optimize it once and leave it be. Some WordPress core, plugins, and theme updates can affect site performance.
It’s essential to monitor your site performance regularly to keep impressing your visitors and sending a strong ranking signal to search engines.
Must have WordPress SEO plugins
WordPress offers you a way to streamline your SEO efforts via plugins. You can use various WordPress SEO plugins to automate SEO strategy and take your SEO game to the next level.
Keep in mind that you don’t need to have several SEO plugins at once. One will do the job, so choose carefully. Here are the ten best WordPress SEO plugins that are worth considering.
1. All in One SEO for WordPress
AIOSEO is one of the most popular WordPress SEO plugins. It’s a comprehensive solution for the majority of SEO challenges. It downloads with a great installation wizard that lets you optimize your website right from the start.
2. Yoast SEO
Yoast SEO is right there beside All in One SEO for WordPress when it comes to popularity. This tool comes with everything you’ll need to optimize your site for search engines. Installation and setup are not challenging, but you will still need to read the instructions if you are doing it for the first time.
3. Semrush SEO Writing Assistant
If you’ve done your keyword research, the Semrush SEO Writing Assistant WordPress plugin can help you to optimize your content better. You can use it for free with a free Semrush account with some limitations.
4. SEOPress
SEOPress is a beginner-friendly WordPress SEO plugin. It comes with SEO features such as meta title, description, image, and content XML sitemaps, open graph support, and more. It also has advanced settings more suitable for savvy WordPress users.
5. Rank Math
Rank Math is the newest addition to the WordPress SEO plugin family. It’s very simple to use. You can use it to optimize your site for social media and search engines. It comes with a lot of features, including XML sitemap generation and content optimization.
6. MonsterInsights
MonsterInsights lets you effortlessly install and use Google Analytics with your WordPress website. You’ll be able to read complete reports within your dashboard. With this tool, you can find out more about your website visitors and the best-performing content.
7. Broken Link Checker
Broken Link Checker will enable you to effortlessly check your content for any broken links or images. The plugin will alert you if it discovers a broken link. You can manually fix it or set the plugin to prevent search engines from crawling the broken links.
8. Yet Another Related Posts Plugin
If you want to keep your visitors more engaged and spend more time on your site, Yet Another Related Posts Plugin is a great pick. It will automatically display content related to the content currently consumed by your site visitor.
9. SEO Optimized Images
SEO Optimized Images is a great plugin if you run an image-heavy website. You can use it to automatically add SEO-friendly titles and alt attributes to all your images. It also supports a custom alt attribute value editor to help you use the post title, categories, or tags in your alt attribute.
10. WPtouch Mobile Plugin
If you don’t want to invest in a mobile-friendly WordPress theme, WPtouch Mobile Plugin will help you achieve a responsive mobile design. The plugin simply transforms your website and makes it mobile-friendly.
On-page and off-page SEO ranking factors
When you’re working on SEO, you need to be aware of the existing factors that influence your ranking. These are elements that influence your ranking in either a negative or positive manner.
There are two types of ranking factors: On-page and Off-page. We’ll go over these factors and elaborate further on some of them throughout the rest of the guide. Some are self-explanatory, whereas others might require clarification.
On-page SEO
Every page of your WordPress website can rank differently. Why? Because they can feature differently optimized on-page ranking factors. It is very important to optimize every page with on-page SEO factors in mind.
Here’s what you need to pay attention to:
- Content – visitors come to your web pages because of the content, which is exactly why search engines use quality and relevance of the content as very important SEO factors. Yes, your content can contain keywords, but it must also offer value to the visitor. It has to be relevant to the topic, well-researched, engaging, and of high quality.
- Title tag – title tag specifies the title of a web page. When you do a search in Google, those blue clickable links that you see in the search results are, in fact, title tags. A well-optimized title tag should: contain keywords first, be between 50 and 60 characters long, and be engaging. Every page on your site should have a unique title tag.
- URL – we have already discussed category hierarchy and permalinks. Well-optimized URLs enable search engines to determine the page’s relevancy to users’ search queries.
- Image alt text – this is used to describe the function and appearance of an image. You should keep alt text descriptive. Feel free to add your keywords but avoid keyword stuffing.
Off-page SEO
Off-page SEO encompasses actions that you take outside of your website. However, these actions can also result in your website ranking better. The major off-page SEO factors include relevance, trustworthiness, and authority.
The most important off-page SEO tactic is link building because search engines see backlinks as proof that you offer quality content.
Other off-page SEO ranking factors include:
- Guest blogging;
- Influencer marketing;
- Brand mentions; and
- Social media marketing.
SEO techniques for WordPress websites
As a beginner, you might find it hard to follow through with all of the SEO best practices we’ve shared with you. We’ve rounded up some of the easiest SEO techniques for WordPress websites.
Start running a blog
If you don’t have a blog section on your WordPress website, you should definitely consider starting one. Blogs enable you to target specific keywords, engage your visitors, and start building a relationship with them.
Remember, you don’t need to post daily. Take a couple of days to identify a relevant topic and to research it well. You need to offer your visitors valuable content, and you won’t be able to do this unless you devote time and effort to it.
Become a guest blogger
If you have some extra time on your hands, why not use it to write content for other websites. It can help you to attract more traffic to your own website. More importantly, you can leverage the popularity of other blogs to establish authority and expand your online reach.
Find the relevant blogs in your industry and review their guest blogging policy. If they allow do-follow links, consider this the start of your link-building initiative.
Be active within your niche
Being active in your niche can help you to expand your network, improve your online influence, and increase organic traffic. However, this goes beyond writing blog posts and optimizing your site for SEO.
There are plenty of options. You can attend webinars, start your YouTube channel, become more active on social media, or launch a podcast on your own.
Learn link building
Link building is very hard to start with. Things become easier once you establish some credibility and authority, and your website starts to generate a lot of traffic. The best place to start would be to launch a broad outreach initiative and ask website owners and blog moderators for backlinks.
Make sure to stay within your niche, as links on non-relevant websites won’t do you much good in terms of SEO or quality traffic. Once you have some of that backlink juice flowing, you can step up your game. Research your competitor’s backlink network to identify opportunities that you can pursue too.
If this sounds confusing to you, here’s a great resource that you can use to learn link building as an absolute beginner.
Conclusion
WordPress offers a variety of opportunities to optimize your website for search engines. Along with the basic SEO settings in the dashboard, you can also use various plugins to streamline your SEO activities.
Make sure that you follow the best on-page SEO practices while working on your off-page SEO strategy. Rember, SEO is both a continuous and long-term effort. It will take time before you can see the results of your work. Continue improving your SEO skills, and you’ll take your online presence to an entirely new level.

Thanks, so detailed and fascinating! It’s really good tips for on page and off page SEO. The recommended links are awesome too and got several meaningful information from there.