How to Embed and Work with YouTube Videos in WordPress

YouTube is 17 years old and it has definitely changed the way people think about video on the Internet. Although there are few other services that are quite popular among users all over the world, Google’s video service is still number one for many of us.
Because of that, WordPress developers made sure that embedding YouTube videos is easy even when you’re just starting out with your blog. And it really is. To embed any video from the popular service, all you have to do is copy and paste the video URL and WordPress will take care of the rest.
Alternatively, you can copy and paste iframe code to the text editor where you can easily change width and height and manipulate the video by changing a few parameters.
Today, you can learn how else you can work with YouTube videos in WordPress.
Automatically add YouTube videos in WordPress
But what if you wanted to automatically add videos to your posts and pages or automatically create a post from a YouTube video? Yes, that is possible and in this part of the guide, we’re about to show you a plugin which can help you quite a lot with that.
YouTube WordPress plugin – video import
PRICE: Premium plugin $36
If you like to post Youtube videos on your WordPress blog, or you make money from the videos, this plugin will tremendously help you. It can save you time by inserting the video and the information that comes with it. Whether it’s the date, image, category or a video tag, the plugin takes care of it.
The YouTube WordPress plugin will automatically import videos from any channel you want, and it can also work with user uploads and playlists. It’s easy to combine sources and choose import intervals, so everything is in your control.
The plugin has sold more than 1300 copies so far, and we are sure that it will keep on collecting happy video users all over the world.
Add YouTube analytics to the WordPress dashboard
When you upload a video to YouTube for the first time, you will probably be spending the day sitting behind the screen and watching statistics. You will wait for the first view and the first like, and you will want everyone to share your work.
After that, not only you can have fun checking the statistics of your videos, but you will be able to see how your audience is responding to your video content. If you want to have a successful channel, you will have to react to their desires and control every aspect.
While you can do that on Youtube itself, wouldn’t it be great to have analytics on your WordPress dashboard where you work every day?
In this part of the article, we will show you an awesome little plugin which will install Youtube data and statistics directly to your WordPress dashboard and allow you to track your channel on the spot, without changing tabs and logging into Youtube separately.
Youtube Analytics Dashboard
PRICE: Free

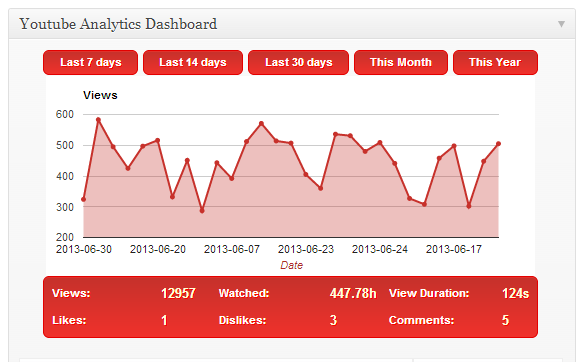
Youtube Analytics Dashboard will show you important information about your videos. Whether you want to know the number of views, the time people spent watching the video, the average duration of each view, likes and dislikes and the number of comments for your video.
Once you install and activate the plugin, you will be able to see all those information in a simple widget on your dashboard. You will have two themes to choose from and furthermore style the looks of the widget through CSS. The plugin will let you set access levels and decide which users on your WordPress powered website will be able to see video stats.
Youtube Analytics Dashboard has a cache feature which allows faster loading speeds – no one likes to watch at a blank screen while the data is being loaded.
- Go to Plugins->Add New
- Search for “Youtube Analytics Dashboard”
- Install and activate the plugin
- Navigate to your dashboard where you will find the new widget
- Click “Get Access Code” link which will take you to your Google account
- Copy and paste the code back into the widget
- Save access code
- Navigate to Settings->YT Dashboard to open the settings where you can set up the widget to your preferences
That’s it. Enjoy watching your Youtube video statistics right from the WordPress dashboard.
Change the automatic width and height for WordPress embedded videos
Isn’t it cool how you can easily copy and paste a Youtube, Vimeo, Flickr, Hulu or many other video services’ URLs and WordPress will automatically embed the video into your post? We think it really is, but if you do that, WordPress will take the settings from the video itself. That probably means that video width and height won’t be something you want in your article.
If embedding videos isn’t something you do on a daily basis, then changing those settings won’t be a problem – you will open the Text Editor and change the numbers in the code. On the other hand, if you have to embed videos often, this simple task might get on your nerves and that’s why you should automatize them.
Change width and height for embedded videos:
- Open your functions.php file
- Copy and paste the following code:
function mycustom_embed_defaults($embed_size){
$embed_size['width'] = 620;
$embed_size['height'] = 360;
return $embed_size;
}
add_filter('embed_defaults', 'mycustom_embed_defaults');
- Change the width and the height to any number of pixels you need for your site
- Save changes
After this, all of your videos will automatically be resized to width and height you have set in the code.
A good thing (or a bad one, depending on how your site is configured) is that after saving the changes, all your videos will be resized. That includes the older ones you have already published.
That’s all, folks. Now go, copy and paste those embedded codes and enjoy how WordPress deals with your new videos.
How to display video in a popup
There is an easy way of displaying your media using a popup. Of course, once again we’re going to use a free plugin which will make things appear in a popup/lightbox just by putting a shortcode in our posts.
By using WP Video Lightbox Plugin, you can place images, flash media, YouTube, Vimeo, iFrame, etc. in a lightbox overlay and make everything look way much better. A great bonus to this plugin is that videos you put in a lightbox can be viewed on iPads and iPhones, too.
WP Video Lightbox Plugin
PRICE: Free
WP Video Lightbox is simple to use but there are a few things you should know before placing your shortcode.
Installation and quick setup:
- Navigate to Plugins -> Add New
- search for “WP Video Lightbox”
- Install and Activate the plugin
- Go to Settings – Video Lightbox
- Open “prettyPhoto” tab
Here you can set up your plugin and choose how it’s going to behave. You can choose default dimensions of the lightbox, shape of the background and its color, make your videos play automatically, etc.
Dealing with shortcodes:
Once you have set up your lightbox, you are ready to place a shortcode in your post and make your desired video appear in a lightbox.
We know you’re impatient so here are simple shortcodes which will allow you to quickly add a Youtube and Vimeo video into a lightbox.
Youtube: [video_lightbox_youtube video_id=”G7a74BvLWUg” width=”640″ height=”480″ anchor=”click here to open YouTube video”]
Vimeo: [video_lightbox_vimeo5 video_id=”12362192″ width=”640″ height=”480″ anchor=”Click and open your video in lightbox”]
Just copy and paste video id for Youtube or Vimeo and you’re ready to go.
Now that you have tried your new lightbox video plugin, let’s what else you can add/change in your shortcode to make it even better.
- video_id (required) – this is the unique number which identifies a video on Youtube/Vimeo
- width (required) – choose a width of the video in pixels
- height (required) – choose a height of the video in pixels
- description – you can add a description of the video which will be shown below your video. Good thing is that description field accepts HTML
- anchor – a text which will be shown as a link a visitor needs to click on in order to show a lightbox. It accepts HTML as well so you can make it a button for example
- auto_thumb – if you use this feature, the plugin will show the video thumbnail instead of anchor text
If you don’t want related videos to be shown in your lightbox video, just add ” &rel=0 ” at the end of video_id.
Shortcode example:
[video_lightbox_youtube video_id=”JKwr064-PBY &rel=0″ width=”800″ height=”600″ auto_thumb=”1″ description=”This is a description of our lightbox video”]
How to add Youtube subscribe button to WordPress
So far, we have been mostly talking about images when it comes to WordPress media. We tried to stress out the importance of adding pictures to blog posts, and on several occasions, we talked about featured images and how to resize them. But since the birth of Youtube and faster Internet connections, videos have entered the world of online multimedia.
While video files were still a rare gem just a few years ago, today you can’t get without them. You will watch movies, music videos, documentaries, and tutorials. Even advertisements have switched media format, and live streamings aren’t as surprising anymore. Because of all that, many authority bloggers register a Youtube account even before they publish the first post.
No matter how great your videos are, and no matter how often do you upload new episodes to Youtube, you will probably struggle to get new subscribers. There are different techniques you can utilize to promote your Youtube channel to the public, but we are not going into details today. Instead, we are going to focus on adding a Youtube subscribe button to your WordPress site.
Just like adding other social media icons to connect with your readers, if you have a Youtube channel, it is important to have a Youtube subscribe button. While some users will be happy to open your channel and subscribe on their own, you will have to work hard to get other people to subscribe. By showing them a simple button on your site, your visitors will be just one click away from subscribing. Also, chances of getting that additional follower will become much greater.
Manually add the button to a widget
Google developers were kind enough to prepare everything for us. So, even without any technical knowledge, you can quite quickly add a Youtube subscribe button to a post, page or widget. For this method, you will need one minute and the knowledge of copy and paste technique.
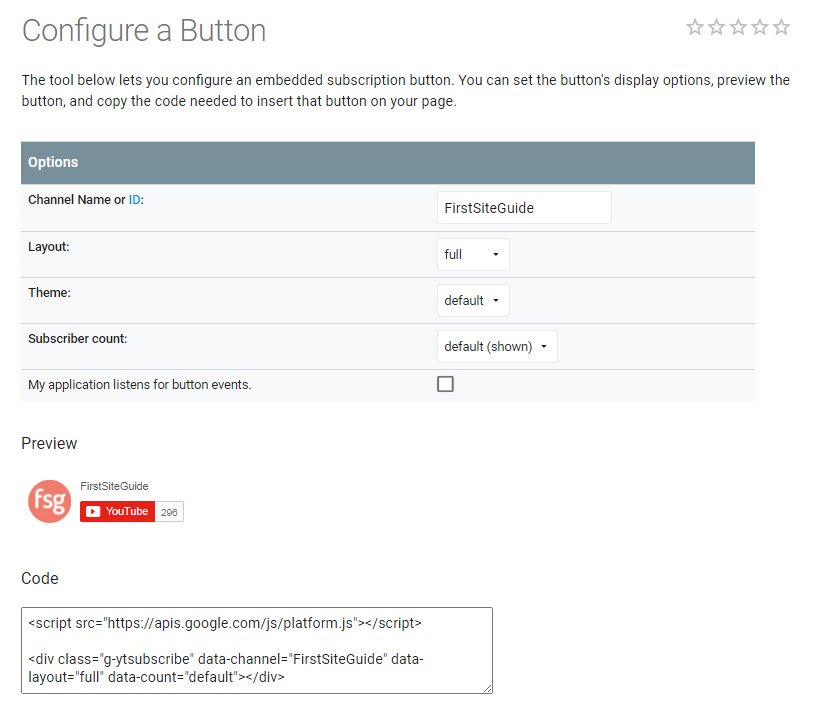
- Go to the official Youtube subscribe button generator
- Write down your channel name or ID
- Select a few options to your likings (layout, theme and subscribers count)
- Take a look at the preview
- Copy the entire code
- Navigate to Appearance -> Widgets
- Add a Text Widget to any active sidebars
- Paste the code
- Save changes
From the moment you save changes, the Youtube subscribe button will appear on your sidebar. Depending on a WordPress theme you have and available widgetized areas, the button may be included in different places. Usually, it will be a sidebar located on the right-hand side of your site or a footer on the bottom of all of your pages.
To change the style of the button, you can go back to the Youtube subscribe button generator and change a few things. You will have to repeat the process of adding the button and replace the code. Note that paid Youtube channels get more options and unique styles.
ytSubscribe – Youtube Subscribe Button
PRICE: Free
If you would like to add a Youtube subscribe button after each and every Youtube video that you embed in WordPress posts, this simple extension for WordPress will help you. The plugin will install a few settings that you can change to your needs. Obviously, the most important one is your channel name and ID.
Additionally, you get to change the theme and layout of the button and decide whether you want to show how many subscribers do you have. For those who know how to work with CSS, there is an option to change the looks of the button directly through the code.
Now, every time that you add a new video to your posts, the plugin will automatically add the button right below it.
SM Youtube Subscribe
PRICE: Free
This free WordPress plugin is very straightforward. It allows you to quickly add a Youtube subscribe button to your WordPress site. You get to change a few settings, but the most interesting thing about it is that it creates a shortcode. With it, you get to show the button in your posts, pages, widgets, and even WordPress templates.
There is nothing much to talk about it – install, enter the details and enjoy the new feature.
TM YouTube Subscribe
PRICE: Free
This free plugin will add a professionally designed Youtube subscribe button to a WordPress widget. Since it requires a Youtube API key, the plugin is just a bit more complicated than the previously mentioned ones.
Still, it creates a nice subscription widget that you can show anywhere you want. You can also add additional text for different situations and make your subscribe button even better.
Youtube Subscriber
PRICE: Free
After installing Youtube Subscriber, the plugin creates a simple widget that will let you control your subscribe button. Navigate to Appearance -> Widgets and find Youtube Subscriber widget to open its settings.
After filling in the basic configuration info, you will get to show the widget on your site, or generate a shortcode that you can use anywhere else the site.
Conclusion
Youtube is still the leading video service on the Internet. The chances are that you’re going to use videos from Google’s service sooner or later, so it’s good to know that you can customize them and change things on your WordPress blog with a few clicks of the mouse button.
How often do you use videos in your WordPress posts? How do you like customizing them? Do you always embed videos from Youtube or do you like other video services?


