How to Move Your Blog from LiveJournal to WordPress

LiveJournal is a simple social networking service that steps into content management waters. This platform had been created for its founder, Brad Fitzpatrick, to easily share his activities with all of his high school friends. That happened back in 1999, so you should consider the fact there was still no Facebook and Instagram available.
Although it has had quite a history and several owners across the globe, LiveJournal simply couldn’t keep up with the modern content management systems like WordPress.
Why should you migrate from LiveJournal to WordPress?
If you care about your blog and want control over it, then you should consider moving your blog from LiveJournal as soon as possible. While it does allow you to write blog posts and show them to the world, LiveJournal offers minimal features and options. There is not much you can do to improve your blog, and if you are on a free plan, the limitations are even more significant.
On the other hand, with self-hosted WordPress, you can do practically anything you want. The design limits are virtually non-existent (if you have the right theme and know your way around WordPress and HTML and CSS, you can do anything you want). There are more than 50,000 plugins that can extend the functionality of your site and even more users who contribute to WordPress on a daily basis.
So without much thinking about it, you should move your blog from LiveJournal to WordPress now.
Let’s start the transfer
If you have read about transferring Blogger to WordPress or any other similar guide, I won’t judge if you are a bit afraid of doing everything on your own. There are usually numerous steps involved in migrating a blog. But there is something good about LiveJournal after all – it is much easier to get it migrated to WordPress than any other platform.
Unfortunately, that’s because LiveJournal comes with some additional restrictions. It can’t be redirected, which means that even after migration, you’re basically starting a new blog (when it comes to the SEO perspective).
Also, LiveJournal does not allow you to import images quickly, but I will show you a trick that should work without problems.
1. Choose the best WordPress hosting
If you are still not quite sure about the differences between self-hosted and WordPress.com, please read what’s so distinct about these two platforms. Because only after you know these differences, you will realize that the self-hosted version requires a host that will take care of your new website.
Choosing the right hosting company that will hand out your blog to the world is almost a full-time job. Among hundreds of hosting companies out there, it is quite challenging to decide on just one that will do a good job. Instead of wasting your time comparing one to another to another, let me suggest Bluehost.
This is one of the most popular WordPress hosting companies, and it is home to more than two million websites across the globe. When you sign up, you will get the best hosting service as well as a free domain that will become a new address to your blog.
Disclosure: FirstSiteGuide is supported by our readers. When you purchase via links on our site we may earn a commission. We test and try all the products that we recommend.
Starting with Bluehost is quite straightforward:
Step One – Get the deal

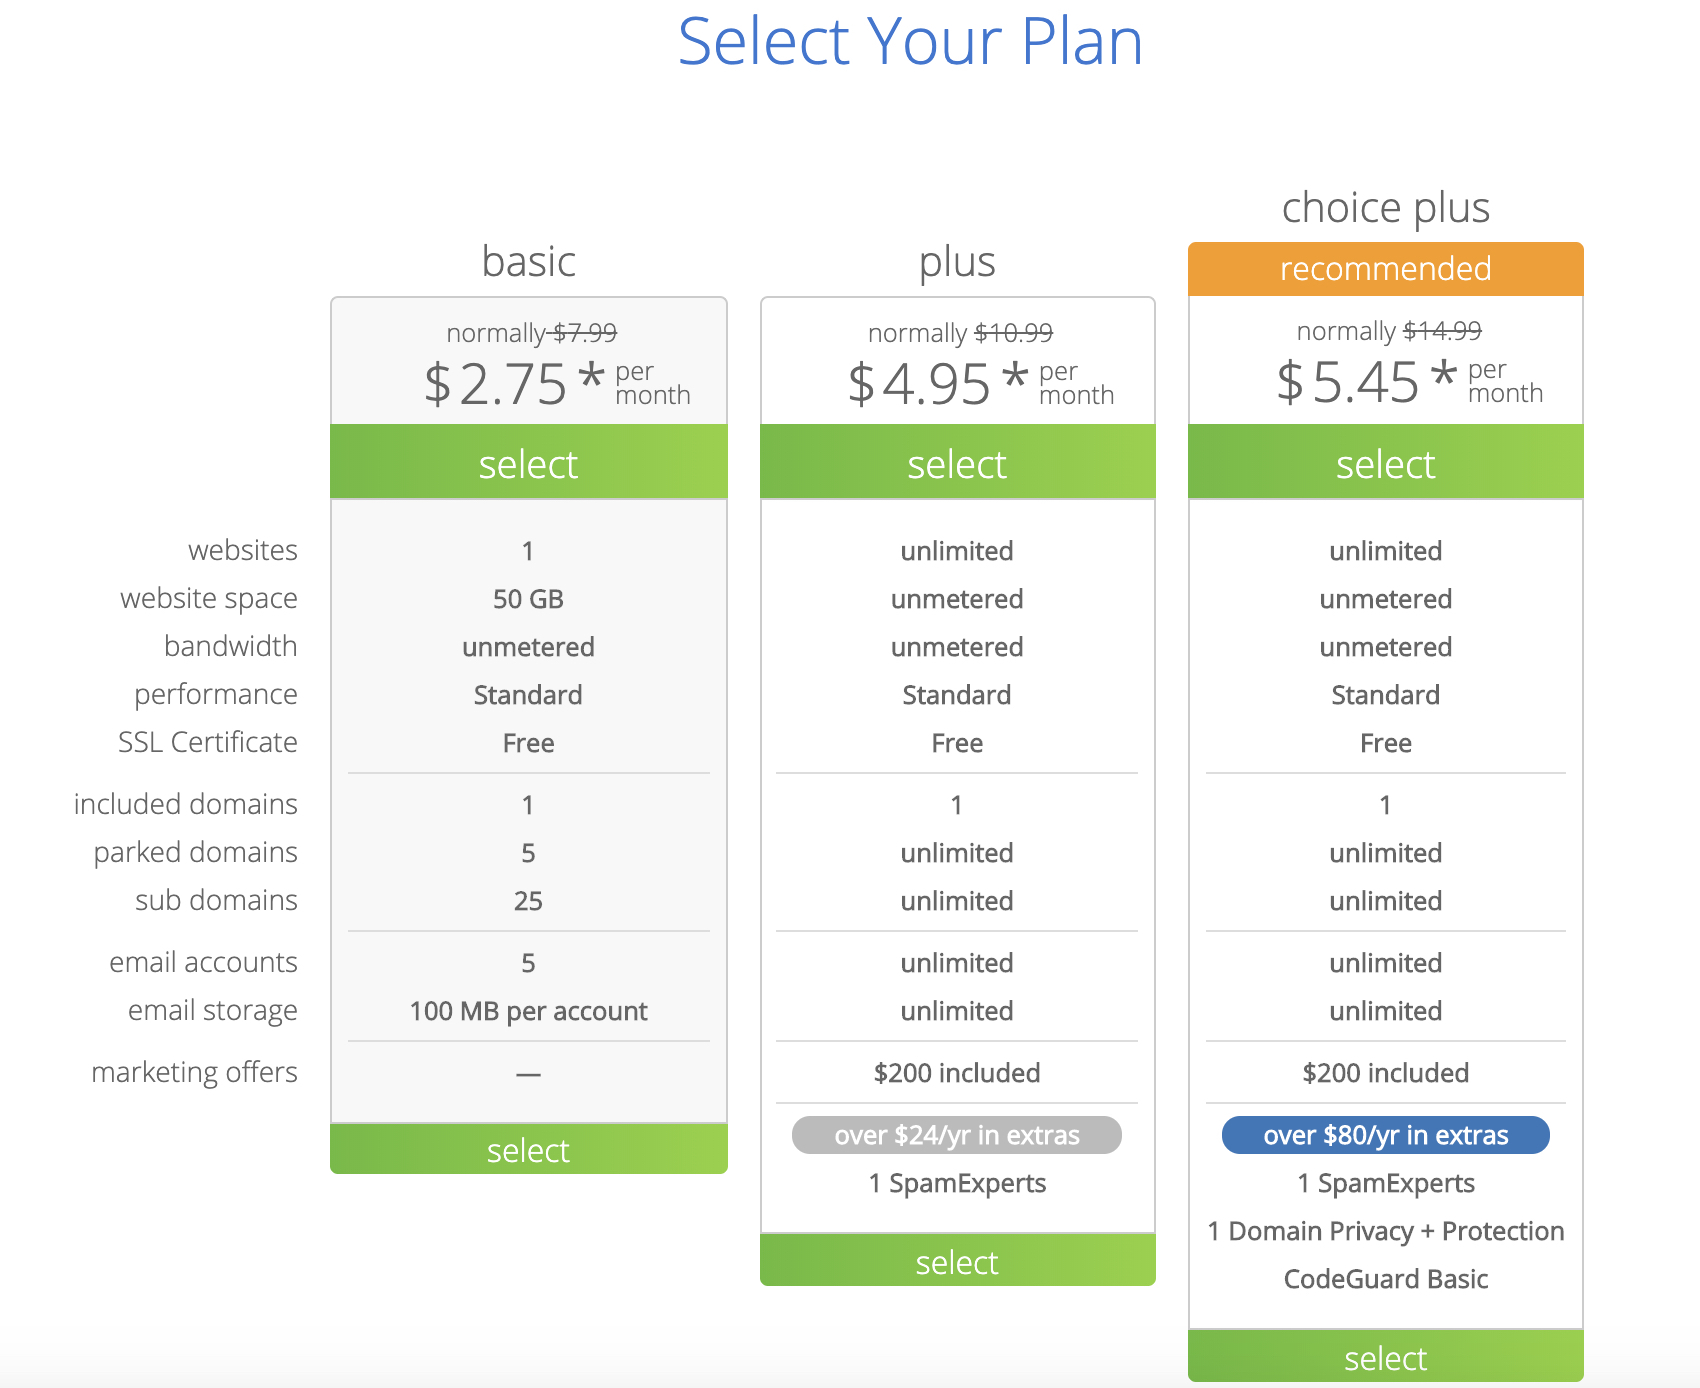
To help you out start this endeavor more easily, I am allowing you to simply click on this link that comes with a discount. Instead of $7.99 per month that is a standard price, you can get your site hosted for as little as $2.75!
Step Two – Choose your pricing plan

Without bothering you with technical details, let me just tell you that since you’re transferring your blog from LiveJournal, it will be more than enough to start with a Basic plan.
This plan will be the most affordable one, and you will get everything you need to power up your new blog. If you realize that you need to improve your blog in the future, you are just one click or one email to support away from expanding the plan, so do not worry.
Step Three – Domain Name
As I mentioned earlier, Bluehost plans come with a free domain. This is an address to your blog, which you shouldn’t change frequently (actually, I do not recommend changing it at all once set up). Since so many domain names are already taken, it has become a hard work coming with a lovely name that’s both available and easy to remember. So, take your time and get some help in choosing a domain name if needed.
2. Install WordPress
Before you can start working on WordPress, where you will be able to import your LiveJournal blog, you need to prepare the environment.
Luckily, installing WordPress on Bluehost is a few clicks away:
- Log in to the cPanel on your Bluehost account
- Navigate to the Website section
- Select “Install WordPress”
- Click the Install button
- Choose the domain name to install it to
- Click “advanced options” if you want to change the email address, username, and password for the new WordPress installation
- Read through the license and service agreements and check the boxes if you agree with everything (you have to agree in order to continue)
- Click the Install Now button
This is it. After the quick eight-step installation, you are ready to move your LiveJournal blog to WordPress!
3. Import LiveJournal blog to WordPress
Importing the now old LiveJournal blog to WordPress is pretty much something you do in a few clicks. You will have to prepare your LiveJournal credentials, and you will be ready to go:
- Open your newly installed WordPress site by going to yoursite.com/wp-admin
- Log in to your WordPress website
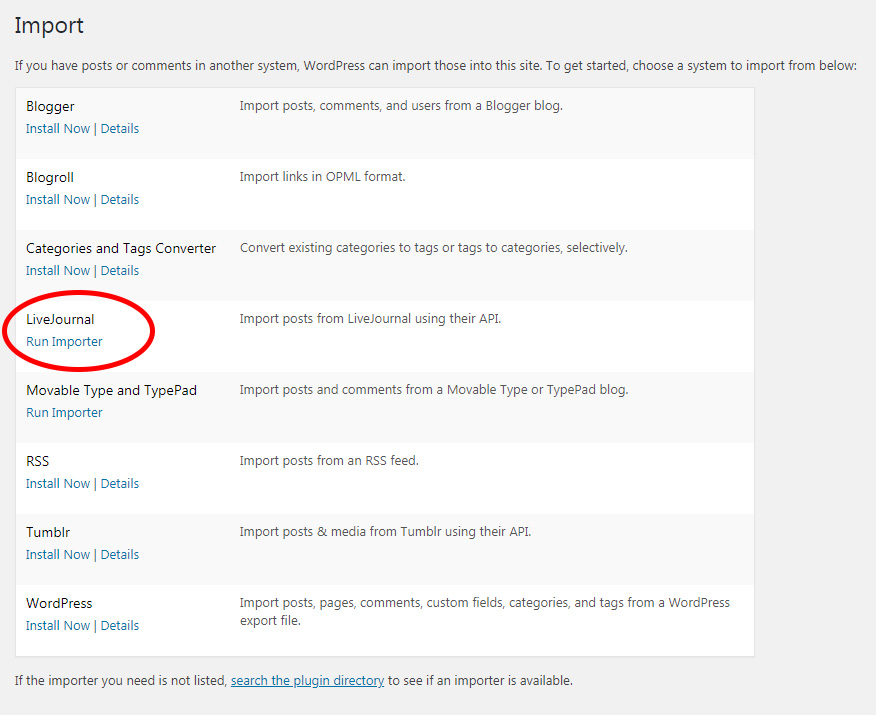
- Go to Tools -> Import located on the left-hand side menu
- Find “LiveJournal,” which should be the fourth option from the top
- Click on the “Install Now” button and wait for a few moments
- Click on the “Run Importer” link that will replace the previous “Install Now” button

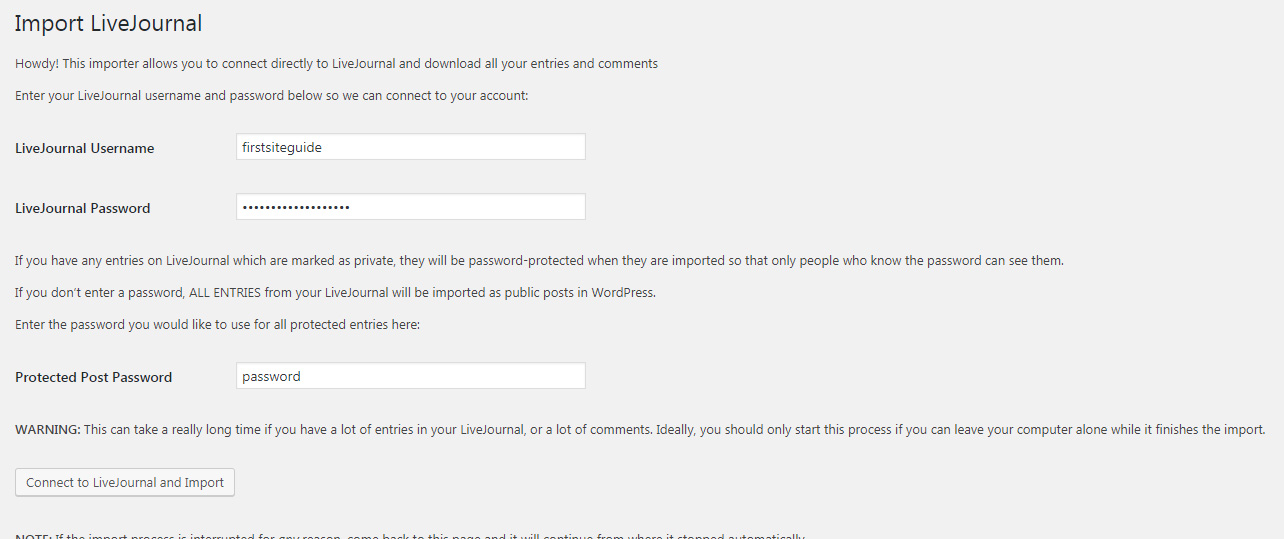
Technically, you have just successfully installed your first WordPress plugin. And after running the importer, you should be able to see a simple screen that asks for some additional information.
In order to connect to LiveJournal, enter your username and password you have been using on the platform.
One of the good things about LiveJournal is that it allows private posts. Since those are password-protected, you will also have to enter a password for them if you want them to stay that way. If you do not enter the password at this moment, please note that all entries from your LiveJournal blog will be imported as public posts, and thus available to anyone to read them.

Before clicking on the “Connect to LiveJournal and Import” button, make sure you have enough time on your hands to complete the job. Depending on the size of your LiveJournal blog, this action may e take even several hours. But since there are not any actions required from your side, just make sure you can leave the computer turned on for some time.
If you have a lot of posts and comments, the tool might easily throw some error messages along the way. So make sure you check the computer now and then so you can refresh the import process. But do not worry – even if you have to refresh the page because an error occurred, the importer will recognize all the previously imported entries, and will continue the import process instead of starting over.
After some time, you should see the “All Done” message. At the same moment, you can give yourself a high five because this means you have successfully transferred your blog!
4. How to handle the images?
Because of the simplicity of the LiveJournal Importer tool, unfortunately, the images can’t be automatically imported. If you do not have a lot of posts and pictures to transfer, the most comfortable option would be to manually open each and every post from LiveJournal, download the images and then upload them to the corresponding WordPress posts.
But since you have already gone into the process of migrating the blog, that’s probably because you have dozens, if not hundreds of them. And with each post, there are usually at least two-three images assigned. So, to import everything, let me show you a better solution:
- Go to Plugins -> Add New
- Search for Auto Upload Images plugin
- Install and Activate it
Luckily, this plugin works on autopilot. Instead of searching for images or messing up with any advanced settings, you simply have to open posts and save them. To try it out, try this:
- Open Posts -> All Posts from WordPress menu
- Open the most recent post
- Click the “Update Now” button
As soon as you do this, the plugin will automatically search for images located in the post. If there any imagery found, the plugin will download the image from the source and immediately upload it to your Media Library in WordPress. Also, the plugin will take care of the code, and make sure that the images in this post load from your new WordPress site, and not the old source.
Now that you have witnessed the power of Auto Upload Images plugin, you can repeat the process for every post you have. Or, to do it faster, you can do this:
- Open Posts -> All Posts
- Select all posts (click the checkbox on top)
- Select the Edit option
- Click Apply.
- When the new screen shows, click the “Update” button
This action will update all selected posts, and allow the Auto Upload Images plugin to do its job on all those posts!
What about redirecting my LiveJournal blog to the new one?
When migrating old blogs to the new ones, people usually like to redirect the traffic, so they do not lose any traffic. That is a good practice, and I strongly suggest it when migrating to WordPress.
Unfortunately, LiveJournal does not allow something like this. Instead of redirecting, the only thing you could do is remove your LiveJournal account and hope that Google and other search engines will catch on the new links as soon as possible.
Improve your new WordPress blog
While managing the missing images completes the migration process, your WordPress blog is at its early beginnings. Yes, the content is up and running, and hopefully, you have managed to import all the pictures.
But your blog is still a rough diamond. WordPress does give you tremendous power, but you will probably need some time to figure it out. You should start learning about WordPress, find a theme, and install first plugins that will help you out.
After that, don’t forget to learn how to monetize your blog. If you have any questions, don’t hesitate to leave a comment or contact me via email.
FAQs
Yes, you should delete your LiveJournal blog after everything has been moved successfully. Because there is nothing you can do about redirects, the old blog will only stand in the way and confuse people. But make sure you delete it only after you have checked that everything is moved successfully to your new WordPress blog.
Don’t worry; if you have a lot of articles and comments that need to be imported, it is typical for the importer tool to stop working, even a few times during the process. All you need to do is refresh the page, and it will resume the import process as nothing happened.
WordPress allows you to password-protect any post, so you can fix this easily. Open each of the posts that you want to protect with a password, and edit it. On the right-hand side of the screen, find the visibility settings, and change the status of the post to Password Protected.
Conclusion
Transferring content from LiveJournal to WordPress is a beginner-friendly process that doesn’t take long. And even if problems appear on the way, I believe all troubles during the migration are well worth it because the result is quite rewarding – having a new blog powered by one of the most powerful content management in the world that basically knows no limits.


Thanks for sharing Anya
You’re welcome! Glad you like it.